Thursday, December 23, 2010

Android #9: Working with Android Intents - Part 4

Refer the previous post to get background on Intents - http://satworks.blogspot.com/2010/12/android-6-working-with-android-intents.html

Explicit Intents with return example: This example demonstrates the inter-activity communication and will show on invoking user defined custom activities from one activity but instead of passing the control to the invoked activity, will stay on the current invoking activity with values updated from invoked activity


layout/main.xml
<?xml version="1.0" encoding="utf-8"?>
<LinearLayout xmlns:android="http://schemas.android.com/apk/res/android"
android:orientation="vertical" android:layout_width="fill_parent"
android:layout_height="fill_parent">
<TextView android:id="@+id/btnMsgId" android:layout_width="fill_parent"
android:layout_height="wrap_content" android:text="@string/msg" />
<Button android:id="@+id/btnRtnId" android:layout_width="fill_parent"
android:layout_height="wrap_content" android:text="@string/invokeRtnBtn" />
</LinearLayout>
BaseInvokingActivity.java
package in.satworks.android.samples.activity;

import android.app.Activity;
import android.content.Intent;
import android.os.Bundle;
import android.view.View;
import android.view.View.OnClickListener;
import android.widget.Button;
import android.widget.Toast;

public class BaseInvokingActivity extends Activity {
/** Called when the activity is first created. */
@Override
public void onCreate(Bundle savedInstanceState) {
super.onCreate(savedInstanceState);
setContentView(R.layout.main);
// Invoke other activity and Return
Button invokeRtnBtn = (Button) findViewById(R.id.btnRtnId);
invokeRtnBtn.setOnClickListener(new OnClickListener() {
@Override
public void onClick(View arg0) {
Intent explicitIntent = new Intent(BaseInvokingActivity.this,
OtherInvokedActivity.class);
explicitIntent.putExtra("FromBaseInvokingActivity",
"Initial Value from FromBaseInvokingActivity");
startActivityForResult(explicitIntent, 1);
}
});
}
/** Called when an activity called by using startActivityForResult finishes. */
@Override
public void onActivityResult(int requestCode, int resultCode, Intent data) {
Bundle extras = data.getExtras();
String returnVal = (String) extras.get("OtherInvokedActivity");
Toast.makeText(BaseInvokingActivity.this, returnVal, Toast.LENGTH_SHORT)
.show();
}
}
OtherInvokedActivity.java
package in.satworks.android.samples.activity;

import android.app.Activity;
import android.content.Intent;
import android.os.Bundle;

public class OtherInvokedActivity extends Activity {
/** Called when the activity is first created. */
@Override
public void onCreate(Bundle savedInstanceState) {
super.onCreate(savedInstanceState);
setContentView(R.layout.main);
Intent intent=getIntent();
Bundle extras=intent.getExtras();
String val=(String)extras.get("FromBaseInvokingActivity");
Intent modifiedIntent=new Intent();
modifiedIntent.putExtra("OtherInvokedActivity", val+":\nNow modified with this text included from OtherInvokedActivity");
setResult(1, modifiedIntent);
finish();
}
}
values/strings.xml
<?xml version="1.0" encoding="utf-8"?>
<resources>
<string name="app_name">ExplicitIntentsApp</string>
<string name="msg">BaseInvokingActivity!</string>
<string name="otherMsg">OtherInvokedActivity!</string>
<string name="invokeRtnBtn">Invoke Other Activity and Return</string>
</resources>
AndroidManifest.xml
<?xml version="1.0" encoding="utf-8"?>
<manifest xmlns:android="http://schemas.android.com/apk/res/android"
package="in.satworks.android.samples.activity" android:versionCode="1"
android:versionName="1.0">
<application android:icon="@drawable/icon" android:label="@string/app_name">
<activity android:name=".BaseInvokingActivity" android:label="@string/app_name">
<intent-filter>
<action android:name="android.intent.action.MAIN" />
<category android:name="android.intent.category.LAUNCHER" />
</intent-filter>
</activity>
<activity android:label="@string/app_name" android:name=".OtherInvokedActivity"></activity>
</application>
<uses-sdk android:minSdkVersion="8" />
</manifest>

Monday, December 20, 2010

Android #8: Working with Android Intents - Part 3

Refer the previous post to get background on Intents - http://satworks.blogspot.com/2010/12/android-6-working-with-android-intents.html

Explicit Intents example: This example demonstrates the inter-activity communication and will show on invoking user defined custom activities from one activity


layout/main.xml
<?xml version="1.0" encoding="utf-8"?>
<LinearLayout xmlns:android="http://schemas.android.com/apk/res/android"
android:orientation="vertical" android:layout_width="fill_parent"
android:layout_height="fill_parent">
<TextView android:layout_width="fill_parent"
android:layout_height="wrap_content" android:text="@string/msg" />
<Button android:id="@+id/btnId" android:layout_width="fill_parent"
android:layout_height="wrap_content" android:text="@string/invokeBtn" />
</LinearLayout>
layout/otherinvoked.xml
<?xml version="1.0" encoding="utf-8"?>
<LinearLayout xmlns:android="http://schemas.android.com/apk/res/android"
android:orientation="vertical" android:layout_width="fill_parent"
android:layout_height="fill_parent">
<TextView android:id="@+id/otherMsgId" android:layout_width="fill_parent"
android:layout_height="wrap_content" android:text="@string/otherMsg" />
</LinearLayout>
BaseInvokingActivity.java
package in.satworks.android.samples.activity;
import android.app.Activity;
import android.content.Intent;
import android.os.Bundle;
import android.view.View;
import android.view.View.OnClickListener;
import android.widget.Button;

public class BaseInvokingActivity extends Activity {
/** Called when the activity is first created. */
@Override
public void onCreate(Bundle savedInstanceState) {
super.onCreate(savedInstanceState);
setContentView(R.layout.main);
// Invoke other activity
Button invokeBtn=(Button)findViewById(R.id.btnId);
invokeBtn.setOnClickListener(new OnClickListener() {
@Override
public void onClick(View arg0) {
Intent explicitIntent=new Intent(BaseInvokingActivity.this, OtherInvokedActivity.class);
explicitIntent.putExtra("FromBaseInvokingActivity", "Value from FromBaseInvokingActivity");
startActivity(explicitIntent);
}
});
}
}
OtherInvokedActivity.java
package in.satworks.android.samples.activity;

import android.app.Activity;
import android.content.Intent;
import android.os.Bundle;
import android.widget.TextView;

public class OtherInvokedActivity extends Activity {
/** Called when the activity is first created. */
@Override
public void onCreate(Bundle savedInstanceState) {
super.onCreate(savedInstanceState);
setContentView(R.layout.otherinvoked);
Intent intent=getIntent();
Bundle extras=intent.getExtras();
String val=(String)extras.get("FromBaseInvokingActivity");
TextView txtView=(TextView)findViewById(R.id.otherMsgId);
txtView.setText("OtherInvokedActivity: "+val);
}
}
values/strings.xml
<?xml version="1.0" encoding="utf-8"?><resources>
<string name="app_name">ExplicitIntentsApp</string>
<string name="msg">BaseInvokingActivity!</string>
<string name="otherMsg">OtherInvokedActivity!</string>
<string name="invokeBtn">Invoke Other Activity</string>
</resources>
AndroidManifest.xml
<?xml version="1.0" encoding="utf-8"?>
<manifest xmlns:android="http://schemas.android.com/apk/res/android"
package="in.satworks.android.samples.activity" android:versionCode="1"
android:versionName="1.0">
<application android:icon="@drawable/icon" android:label="@string/app_name">
<activity android:name=".BaseInvokingActivity" android:label="@string/app_name">
<intent-filter>
<action android:name="android.intent.action.MAIN" />
<category android:name="android.intent.category.LAUNCHER" />
</intent-filter>
</activity>
<activity android:label="@string/app_name" android:name=".OtherInvokedActivity"></activity>
</application>
<uses-sdk android:minSdkVersion="8" />
</manifest>

Android #7: Working with Android Intents - Part 2

Refer the previous post to get background on Intents - http://satworks.blogspot.com/2010/12/android-6-working-with-android-intents.html

Implicit Intents example: Following example demonstrates the inter-activity communication and will show on invoking some of the built-in Android activities from one activity


layout/main.xml
<?xml version="1.0" encoding="utf-8"?>
<LinearLayout xmlns:android="http://schemas.android.com/apk/res/android"
android:orientation="vertical" android:layout_width="fill_parent"
android:layout_height="fill_parent">
<TextView android:layout_width="fill_parent"
android:layout_height="wrap_content" android:text="@string/msg" />
<Button android:id="@+id/btnDialId" android:layout_width="fill_parent"
android:layout_height="wrap_content" android:text="@string/btnDialTxt"
android:gravity="right|center_vertical" />
<Button android:id="@+id/btnCallId" android:layout_width="fill_parent"
android:layout_height="wrap_content" android:text="@string/btnCallTxt"
android:gravity="right|center_vertical" />
<Button android:id="@+id/btnSMSId" android:layout_width="fill_parent"
android:layout_height="wrap_content" android:text="@string/btnSMSTxt"
android:gravity="right|center_vertical" />
<Button android:id="@+id/btnSearchId" android:layout_width="fill_parent"
android:layout_height="wrap_content" android:text="@string/btnSearchTxt"
android:gravity="right|center_vertical" />
<Button android:id="@+id/btnBrowseId" android:layout_width="fill_parent"
android:layout_height="wrap_content" android:text="@string/btnBrowseTxt"
android:gravity="right|center_vertical" />
<Button android:id="@+id/btnGoogleMapId" android:layout_width="fill_parent"
android:layout_height="wrap_content" android:text="@string/btnGoogleMapTxt"
android:gravity="right|center_vertical" />
<Button android:id="@+id/btnViewContactsId"
android:layout_width="fill_parent" android:layout_height="wrap_content"
android:text="@string/btnViewContactsTxt" android:gravity="right|center_vertical" />
</LinearLayout>

ImplicitIntentsActivity.java
package in.satworks.android.samples.activity;

import android.app.Activity;
import android.app.SearchManager;
import android.content.Intent;
import android.net.Uri;
import android.os.Bundle;
import android.provider.ContactsContract;
import android.view.View;
import android.view.View.OnClickListener;
import android.widget.Button;

public class ImplicitIntentsActivity extends Activity {
/** Called when the activity is first created. */
@Override
public void onCreate(Bundle savedInstanceState) {
super.onCreate(savedInstanceState);
setContentView(R.layout.main);
// To Dial a number
launchDialer();
// To Call a Number
// Requires android.permission.CALL_PHONE
callNumber();
// To SMS a Number
launchSMS();
// To perform local search
performLocalSearch();
// To open browser with URL
launchBrowser();
// To launch Google Maps
showGoogleMap();
// To View existing contacts stored in phone
showContacts();
}

// To View existing contacts stored in phone
private void showContacts() {
Button viewContacts = (Button) findViewById(R.id.btnViewContactsId);
viewContacts.setOnClickListener(new OnClickListener() {
@Override
public void onClick(View v) {
Intent contacts = new Intent();
contacts.setAction(android.content.Intent.ACTION_VIEW);
contacts.setData(ContactsContract.Contacts.CONTENT_URI);
startActivity(contacts);
}
});

}

// To launch Google Maps
private void showGoogleMap() {
Button googleMapBtn = (Button) findViewById(R.id.btnGoogleMapId);
googleMapBtn.setOnClickListener(new OnClickListener() {
@Override
public void onClick(View v) {
Intent intent = new Intent(Intent.ACTION_VIEW, Uri
.parse("geo:13.05,80.20"));
startActivity(intent);
}
});
}

// Open a browser window to the URL specified.
private void launchBrowser() {
Button browseBtn = (Button) findViewById(R.id.btnBrowseId);
browseBtn.setOnClickListener(new OnClickListener() {
@Override
public void onClick(View v) {
Intent intent = new Intent(Intent.ACTION_VIEW, Uri
.parse("http://www.android.com"));
startActivity(intent);
}
});
}

// Perform local search
private void performLocalSearch() {
Button searchBtn = (Button) findViewById(R.id.btnSearchId);
searchBtn.setOnClickListener(new OnClickListener() {
@Override
public void onClick(View v) {
Intent intent = new Intent(Intent.ACTION_SEARCH);
intent.putExtra(SearchManager.QUERY, "Test");
startActivity(intent);
}
});
}

// To launch SMS
private void launchSMS() {
Button smsBtn = (Button) findViewById(R.id.btnSMSId);
smsBtn.setOnClickListener(new OnClickListener() {
@Override
public void onClick(View v) {
Intent intent = new Intent(Intent.ACTION_SENDTO, Uri
.parse("sms:123456789"));
intent.putExtra("sms_body", "Test SMS message.....");
startActivity(intent);
}
});
}

// Calls the entered phone number.
private void callNumber() {
Button callBtn = (Button) findViewById(R.id.btnCallId);
callBtn.setOnClickListener(new OnClickListener() {
@Override
public void onClick(View v) {
Intent intent = new Intent(Intent.ACTION_CALL, Uri
.parse("tel:123456789"));
startActivity(intent);
}
});
}

// Dials (but does not actually initiate the call) the number given
private void launchDialer() {
Button dialBtn = (Button) findViewById(R.id.btnDialId);
dialBtn.setOnClickListener(new OnClickListener() {
@Override
public void onClick(View v) {
Intent intent = new Intent(Intent.ACTION_DIAL, Uri
.parse("tel:123456789"));
startActivity(intent);
}
});
}
}

values/strings.xml
<?xml version="1.0" encoding="utf-8"?>
<resources>
<string name="app_name">ImplicitIntentsApp</string>
<string name="msg">ImplicitIntentsActivity! \nTry out few of the predefined intents\n</string>
<string name="btnDialTxt">Launch Dialer</string>
<string name="btnCallTxt">Launch Call</string>
<string name="btnSMSTxt">Launch SMS</string>
<string name="btnSearchTxt">Launch Search</string>
<string name="btnBrowseTxt">Launch Browser</string>
<string name="btnGoogleMapTxt">Launch Google Map</string>
<string name="btnViewContactsTxt">Launch Phone Contacts</string>
</resources>

AndroidManifest.xml
<?xml version="1.0" encoding="utf-8"?>
<manifest xmlns:android="http://schemas.android.com/apk/res/android"
package="in.satworks.android.samples.activity" android:versionCode="1"
android:versionName="1.0">
<application android:icon="@drawable/icon" android:label="@string/app_name">
<activity android:name=".ImplicitIntentsActivity"
android:label="@string/app_name">
<intent-filter>
<action android:name="android.intent.action.MAIN" />
<category android:name="android.intent.category.LAUNCHER" />
</intent-filter>
<intent-filter>
<action android:name="android.intent.action.VIEW" />
<category android:name="android.intent.category.DEFAULT" />
</intent-filter>
</activity>
</application>
<uses-sdk android:minSdkVersion="8" />
<uses-permission android:name="android.permission.CALL_PHONE"/>
</manifest>

Android #6: Working with Android Intents - Part 1

Android Intents are used for event notifications thus notifying applications about an event through passing messages between components/activities. In simple words, intents are messages that are passed between components. An Intent object holds the content of the message. For example, notifies when a SMS arrives, or SD card inserted into the device etc. Any component that wants to invoke another component has to express only through “intents” to perform a job.

Intents are typically used to activate components such as activities, services, and broadcast receivers. That is for launching an activity, broadcast messages for broadcast receivers, start a service/bind a service to communicate with any background service. Intents typically needs the basic information’s such as action to be performed and data to operate on.

  1. For activating the activity component, intent object holding the message content is passed to startActivity or startActivityForResult operations
  2. For activating the service component, intent object holding the message content is passed to startService operation
  3. For initiating a broadcast, intent object holding the message content is passed to sendBroadcast, sendOrderedBroadcast, and sendStickyBroadcast operations

Communication between components is achieved through intents. There are two primary form of intents namely

  1. Implicit Intents: Intents that do not name or specify a target component are termed as Implicit Intents. It is left to the platform to find an appropriate component to respond to the intent. Android platform resolves as to which component is most suitable to respond to such implicit intents using intent filters configured within Android Manifest file.
  2. Explicit Intents: Unlike Implicit Intents, you actually specify the target component that is required to respond to the intent.
Typical Intents Usage:

  • Inter-Activity (Activity-to-Activity) Communication: Here we can use Intents to pass information between activities wherever we have a need for creating multiple activities, and there exists a need for communicating/passing information between them. The activities can be implicit or explicit activities
  • Activity-Service Communication: Here we can use Intents to make a service perform a information update in an activity.
Examples:

Thought would create three different examples to show on inter-activity (activity-to-activity) communication in separate posts.

  1. Implicit Intents example: This example demonstrates the inter-activity communication and will show on invoking some of the built-in Android activities from one activity (http://satworks.blogspot.com/2010/12/android-7-working-with-android-intents.html)
  2. Explicit Intents example: This example demonstrates the inter-activity communication and will show on invoking user defined custom activities from one activity (http://satworks.blogspot.com/2010/12/refer-previous-post-to-get-background.html)
  3. Explicit Intents with return example: This example demonstrates the inter-activity communication and will show on invoking user defined custom activities from one activity but instead of passing the control to the invoked activity, will stay on the current invoking activity with values updated from invoked activity (http://satworks.blogspot.com/2010/12/android-9-working-with-android-intents.html)

Sunday, December 12, 2010

Android #5: Working with Custom Fonts

All Android devices comes with a standard collection of fonts namely Droid Sans, Droid Sans Mono, and Droid Serif as they are designed to be optimal for mobile displays. But there might be a need for using custom fonts for some special purposes say for example, Indic Tamil fonts which Android doesn’t support currently. So as a workaround in getting such fonts for a special need, we can go with using custom fonts features that Android supports.

Following example illustrates on using custom fonts in Android application


layout/main.xml:

<?xml version="1.0" encoding="utf-8"?>
<LinearLayout xmlns:android="http://schemas.android.com/apk/res/android"
android:orientation="vertical" android:layout_width="fill_parent"
android:layout_height="fill_parent">
<TextView android:layout_width="fill_parent"
android:layout_height="wrap_content" android:textSize="27px"
android:text="@string/msg" />
<!-- Line -->
<View android:layout_width="fill_parent" android:layout_height="2dp"
android:background="#99CCFF" />
<TextView android:id="@+id/tamilTxtId" android:layout_width="fill_parent"
android:layout_height="wrap_content" android:textSize="27px"
android:textColor="#CDE472" />
<TextView android:id="@+id/txtId" android:layout_width="fill_parent"
android:layout_height="wrap_content" android:text="@string/engFont"
android:textSize="27px" android:textColor="#CDE472" />
</LinearLayout>

CustomFontActivity.java:

package in.satworks.android.samples.activity;import android.app.Activity;
import android.graphics.Typeface;
import android.os.Bundle;
import android.widget.TextView;

public class CustomFontActivity extends Activity {
/** Called when the activity is first created. */
@Override
public void onCreate(Bundle savedInstanceState) {
super.onCreate(savedInstanceState);
setContentView(R.layout.main);
// Use ENGLISH font
Typeface face=Typeface.createFromAsset(getAssets(), "fonts/VLADIMIR.ttf">
TextView txtView=(TextView)findViewById(R.id.txtId);
txtView.setTypeface(face);
// Use TAMIL font
Typeface tamilFace=Typeface.createFromAsset(getAssets(), "fonts/Eltpan-n.ttf");
TextView tamilTxtView=(TextView)findViewById(R.id.tamilTxtId);
tamilTxtView.setText("1: \u0053\u00D6\u005D\u00EB \u0045\u005D\u00EB \u0053\u0081\u0054\u005D\u00EB");
tamilTxtView.setTypeface(tamilFace);
}
}
Custom Fonts:
Custom font files need to be dropped under assets folder of your android project
  • assets/fonts/VLADIMIR.TTF
  • assets/fonts/Eltpan-n.ttf

Tuesday, November 9, 2010

Android #4: Working with Android Resources - String Resources

Typically the res folder within any android project contains all external resources such as icons, images, layout, string etc under the respective sub-folders within. All resources are bound to the app in a way that we can change them without the need to recompile the app or change any app code. Unlike assets, android generates an ID in R.java file (auto-generated file) for each resource file using which they will be accessed within the code. Resources are very much useful when developing multi-lingual app supporting l10n and i18n.

Types of resources:
  • Strings, colors, arrays, dimensions are defined in res/values/ directory. Typical usage would be in Localization and Internationalization
  • Images are defined in res/drawable directory. Typical usage would be to put all the images or icons that an application needs
  • XML’s are defined in res/xml/ directory for xml files. Typical usage would be to hold custom data that can be used in application
  • Layout resources are defined in res/layout/ for declaring the views. Typical usage would be to construct the user interface of the activities
Following example illustrates accessing resources from res folder in a simple android project:


Working with String resources:

Android offers three types of string resources: Plain Strings, string formats and styled texts. Refer the following examples

layout/main.xml:
<?xml version="1.0" encoding="utf-8"?>
<LinearLayout xmlns:android="http://schemas.android.com/apk/res/android"
android:orientation="vertical" android:layout_width="fill_parent"
android:layout_height="fill_parent">

<!-- ResourceDemo -->
<TextView android:layout_width="fill_parent"
android:layout_height="wrap_content" android:text="@string/resPlainStrTxt"
android:textColor="#CDE472" />

<!-- Line -->
<View android:layout_width="fill_parent" android:layout_height="2dp"
android:background="#99CCFF" />

<TextView android:layout_width="fill_parent"
android:layout_height="wrap_content"
android:text="Plain String Resources - This is referenced from res/layout/main.xml"
android:textColor="#CDE472" />

<!-- Line -->
<View android:layout_width="fill_parent" android:layout_height="2dp"
android:background="#99CCFF" />

<TextView android:id="@+id/resPlainStrTxtId"
android:layout_width="fill_parent" android:layout_height="wrap_content"
android:textColor="#CDE472" />

<!-- Line -->
<View android:layout_width="fill_parent" android:layout_height="2dp"
android:background="#99CCFF" />

<TextView android:id="@+id/resFormattedStrTxtId"
android:layout_width="fill_parent" android:layout_height="wrap_content"
android:text="@string/resFormattedStrTxt" android:textColor="#CDE472" />

<!-- Line -->
<View android:layout_width="fill_parent" android:layout_height="2dp"
android:background="#99CCFF" />

<TextView android:id="@+id/resStyledStrTxtId" android:layout_width="fill_parent"
android:layout_height="wrap_content" android:textColor="#CDE472" android:text="@string/resStyledStrTxt"/>

<!-- Line -->
<View android:layout_width="fill_parent" android:layout_height="2dp"
android:background="#99CCFF" />

</LinearLayout>
ResourceDemoActivity.java
package in.satworks.android.samples.activity;

import android.app.Activity;
import android.os.Bundle;
import android.widget.TextView;

public class ResourceDemoActivity extends Activity {
private TextView resPlainStrTxtView=null;
private TextView resFormattedStrTxtView=null;
private TextView resStyledStrTxtView=null;
/** Called when the activity is first created. */
@Override
public void onCreate(Bundle savedInstanceState) {
super.onCreate(savedInstanceState);
setContentView(R.layout.main);

// Working with resources - Start
// Accessing Resources for Plain String contents from the resources folder - start
resPlainStrTxtView=(TextView)findViewById(R.id.resPlainStrTxtId);
resPlainStrTxtView.setText("Plain String Resources - This is referenced from code");
// Accessing Resources for Plain String contents from the resources folder - end

// Accessing Resources for Formatted String contents from the resources folder - start
resFormattedStrTxtView=(TextView)findViewById(R.id.resFormattedStrTxtId);
String formatStr=getString(R.string.resFormattedStrTxt);
String formattedStr=String.format(formatStr, "- \"This New Formatted Text\"");
resFormattedStrTxtView.setText(formattedStr);
// Accessing Resources for Formatted String contents from the resources folder - end

// Accessing Resources for Formatted String contents from the resources folder - start
resStyledStrTxtView=(TextView)findViewById(R.id.resStyledStrTxtId);
/* without styling
String styleStr=getString(R.string.resStyledStrTxt);
resStyledStrTxtView.setText(styleStr);
*/
// with styling
resStyledStrTxtView.setText(R.string.resStyledStrTxt);
// Accessing Resources for Formatted String contents from the resources folder - end
// Working with resources - End
}
}
values/strings.xml:
<?xml version="1.0" encoding="utf-8"?>
<resources>
<string name="app_name">ResourceDemo</string>
<string name="resPlainStrTxt">Plain String Resources - This is referenced from res/values/string.xml</string>
<string name="resFormattedStrTxt">Formatted String Resources - This is referenced from res/values/string.xml and is formatted with %1$s</string>
<string name="resStyledStrTxt">Styled String Resources - This is referenced from res/values/string.xml and is styled with \n<b>bold</b>, \n<u>underline</u> and \n<i>italics</i></string>
</resources>

Monday, November 8, 2010

Android #3: Working with Android Assets

Assuming that the user knows to create a HelloWorld kinda simple android app, we will look into understanding assets and means to access them within the android app.

Working with Assets:

Typically the asset folder within any android project that contains static files that one wishes to package within the application for deployment onto the device, read as a stream of bytes and accessed as just like the way we access the file system in java programming language. All files within this folder doesn’t generate an ID in R.java file (auto-generated file).

Following example illustrates accessing contents of a static file from the assets folder in a simple android project:


main.xml:

<?xml version="1.0" encoding="utf-8"?>
<LinearLayout xmlns:android="http://schemas.android.com/apk/res/android"
android:orientation="vertical" android:layout_width="fill_parent"
android:layout_height="fill_parent">

<!-- AssetDemo -->
<TextView android:id="@+id/assetTxtId" android:layout_width="fill_parent"
android:layout_height="wrap_content" android:textColor="#FFCC33" />

</LinearLayout>
AssetDemoActivity.java:

package in.satworks.android.samples.activity;

import java.io.BufferedReader;
import java.io.IOException;
import java.io.InputStream;
import java.io.InputStreamReader;

import android.app.Activity;
import android.content.res.AssetManager;
import android.os.Bundle;
import android.widget.TextView;

public class AssetDemoActivity extends Activity {
private TextView assetTxtView=null;
/** Called when the activity is first created. */
@Override
public void onCreate(Bundle savedInstanceState) {
super.onCreate(savedInstanceState);
setContentView(R.layout.main);

// Retrieving contents of a static file from the assets folder - start
assetTxtView=(TextView)findViewById(R.id.assetTxtId);
readAsset();
// Retrieving contents of a static file from the assets folder - end
}

private void readAsset()
{
//Get asset manager instance
AssetManager assetMngr=getAssets();
//Read contents from file under assets
try {
InputStream inStream=assetMngr.open("HelloAsset.txt");
BufferedReader bReader=new BufferedReader(new InputStreamReader(inStream));
String assetText="";
String asText="";
while((asText=bReader.readLine())!=null)
{
System.out.println("[AssetDemoActivity] [assetText] ***** "+assetText);
assetText=assetText+asText+"\n";
}
assetTxtView.setText(assetText);
bReader.close();
inStream.close();
} catch (IOException e) {
e.printStackTrace();
}
}
}

assets/HelloAsset.txt:
AssetDemo: This is referenced from assets/HelloAsset.txt

Tuesday, October 5, 2010

Trends: Smarter Internet TV

Just like smart phones, Google has come-up with the concept of smart TV where just like the platform such as Android, it will have an open software platform probably a mix of Android and Chrome enabling any developer to develop applications for it. Google is yet to release the Google SDK and web APIs for TV using which developers can build richer applications and then distribute them through Android Market

Screen shot:


Key features:
  1. Search within TV to fetch all related content across every channel, app and web simultaneously. Search & record features for DTH subscribers
  2. Browse the web with support for even watching web and TV at the same time.
  3. Use apps similar to smart phone apps with support for existing Android Market apps that will be soon supported within Google TV
  4. Use smart phones like Android Phones or iPhone as TV remote control with multiple phones support to control the same TV
  5. Personalize within what one watches within the TV
  6. Easy set-up with seamless integration with existing TV and internet
Google-vantages:

  • Placing geo-target advertisements wherein helping the local businesses and targeting more users and all couch potatoes :)
  • People watching Google TV can place orders or search for more info on the advertised products based on the commercial
  • Companies providing video-on-demand services like NetFlix, Amazon Video-on-Demand can improvise their business by targeting their services on multi-platforms
  • Users using Android Phones will benefit in accessing apps on both smart phones and as well their TV. In addition, ease for Android developers to develop apps
  • Enables the social media users to stay connected with their friends even while watching TV

Google might use this platform for enabling or benefiting the different segmentized users by
So what one needs to get Google TV ?

  • Standalone smart TV like the one introduced recently by Sony named Sony Internet TV - a HDTV incorporating the Google TV platform, or
  • Separate set-up box kinda to use with your current TV like the one introduced by Logitech named Logitech Revue Google TV companion box that connects to your TV with an HDMI port

As these products are just introduced, we will have to wait for them to be available in retail soon may be in the year 2011. As a fact of trend that most world's favorite websites are being tweaked and perfected for TV nowadays, it will pick-up in those lines of business or similar kinda business bringing more and more such products into the market enriching user experience

So guyz get ready for developing apps for the TV now!!

Reference Links:

Tuesday, August 17, 2010

Trends: Wireless Electricity..the invisible power

As I could remember, it all started with radio transmitters, television remote control, cellphones and then the Wi-Fi routers for wireless network/internet, wireless gaming controllers, Global Positioning Systems (GPS). These systems uses some form of energy like radio frequency, infrared light, acoustic energy etc to transfer data without wires. But now the trend seems to move towards wireless chargers for these and/or most other devices. So how did this begin for the guy who found this?

Marin Soljacic, Assistant Professor of Physics at Massachusetts Institute of Technology (MIT) came to invent this idea when he noticed a mobile phone beeped starving to get charged which made him to think on why the phone is not capable of self charging when all the needed electrical source is near-by. So to make this possible, one has to find a way to transfer power from existing wired source to cell phone - without wires without much affect to things around it. So he started thinking on this phenomenon that could make this dream a reality. He dug into the problem and learned that if you could get two magnetic fields to resonate with the same note, they could transfer an electric current

MIT, his employer, quickly patented the technology and encouraged Soljacic to start a company. That's how WiTricity started with 15 employees to take forward this idea. To answer the safety concerns, he explained that in fact, the coils turn electricity into magnetic fields, then back into electricity. Magnetic fields interact weakly with humans; as far as the fields are concerned, we are no different from air.

Technology:

From their technology notes, When two objects have the same resonant frequency, they exchange energy strongly without having an effect on other, surrounding objects. For example, it is resonance that can cause a wine glass to explode when a singer hits exactly the right tone. But instead of using acoustic resonance, Witricity's approach exploits the resonance of low frequency electromagnetic waves.


How Wireless Power works


1. Magnetic coil (Antenna A) is housed in a box and can be set in wall or ceiling.
2. Antenna A, powered by mains, resonates at a specific frequency.
3. Electromagnetic waves transmitted through the air.
4. Second magnetic coil (Antenna B) fitted in laptop/TV etc resonates at same frequency as first coil and absorbs energy.
5. Energy charges the device.

The system uses two coils - one plugged into the mains and the other embedded or attached to the gadget. Each coil is carefully engineered with the same resonant frequency. When the main coil is connected to an electricity supply, the magnetic field it produces is resonant with that of with the second coil, allowing "tails" of energy to flow between them.

As each "cycle" of energy arrives at the second coil, a voltage begins to build up that can be used to charge the gadget.

Devices using the system would automatically begin to charge as soon as they were within range, he said.

Applications:

WiTricity’s wireless power transfer technology can be applied in a wide variety of applications and environments. WiTricity technology can be used to provide:
  • Wireless Power—when all the power a device needs is provided wirelessly, and no batteries are required. This mode is for a device that is always used within range of its WiTricity power source.
  • Automatic Wireless Charging—when a device with rechargeable batteries charges itself while still in use or at rest, without requiring a power cord or battery replacement. This mode is for a mobile device that may be used both in and out of range of its WiTricity power source.

Detailed List of applications that can use this technology:
Reference Links:

Thursday, August 12, 2010

Android #2: Understanding Android Architecture & Project Structure

Android Architecture:

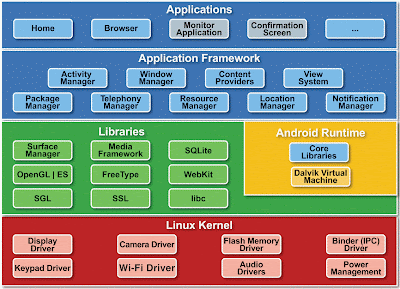
Design goal of Android is openness with greater flexibility, and enabling rapid development. Each layer in Android architecture uses languages like Java for application development with the underlying framework on Java as well that in turn makes use of C/C++ libraries and runs upon the C based operating system and drivers.


Platform Architecture:
  • Applications: Basic applications include an email client, SMS program, calendar, maps, browser, contacts, etc.,. All applications are written in Java programming language
  • Application Framework: Developers have full access to the same framework APIs used by applications base. The architecture is designed to simplify the reuse of components, any application can publish its capabilities and any other application can then make use of those capabilities (subject to safety rules framework). This same mechanism allows components to be replaced by the user. Thus it provides no limit to the applications being developed.
  • Libraries: Android includes a set of libraries C / C++ used by various components of the Android system. These features are exposed to developers through the Android application framework, some of them includes a System C library (C standard library implementation), media libraries, graphics libraries, 3d support through Open GL, SQLite embedded database etc.,
  • Runtime Android: Android includes a set of base libraries that provide most of the features available in the libraries of the Java language base. Every Android application runs its own process, with its own instance of the Dalvik Virtual Machine (DVM)
  • Kernel – Linux: Android depends on Linux version 2.6 for basic services such as security system, memory management, process management, network stack and driver model. The kernel also acts as an abstraction layer between hardware and the rest of the software stack

Application Architecture:

As said earlier, Android platform is typically based upon Linux Kernel. Android applications are written in Java but they don’t run on standard Java Virtual Machine (JVM) instead runs on a special Java based virtual machine called the Dalvik Virtual Machine (DVM) which is again an open source technology (Apache harmony) running within a Linux Kernel process. JVM is stack based VM and DVM is register based VM. So just like how Java byte codes are executed by the JVM, here classes are converted into Dalvik Executables (.dex) using DX tool. Dalvik has been written so that a device can run multiple VMs efficiently. Dalvik executes files in the Dalvik Executable which is optimized for minimum memory.

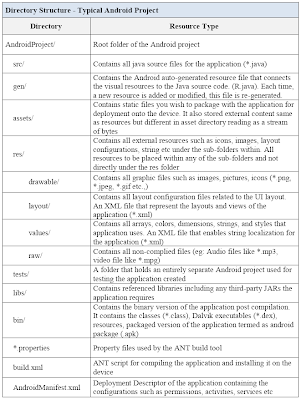
A Typical Android Project Structure:

Below table provides a view of how a typical android project will look like


Reference Links:

Thursday, August 5, 2010

Index Removal from Major Search Engines like Google, Bing and Yahoo Search

Indices…

First to understand on what the index is all about, every search query on search engines actually scans every web page document exposed on the internet to fetch the relevant results that would require considerable time and computing power. Just to optimize this behavior for speedy retrieval and improving the performance on finding relevant documents for a search query, major search engines collects, parses and stores data by creating index of web documents facilitating faster and accurate information retrieval.

Search Bots…

Secondly, to understand on when the search engines collects those valuable information, every search engine uses something termed as internet “Bots” or “web robots” that are nothing but software applications that run automated tasks over the internet to gather data. Every web server hosting web sites has something called “robots.txt” that controls these bots on whether a particular data can be indexed or not.

Control Bots for Indices…

In order to include specific pages/folders to be indexed, we can use the ‘ALLOW’ directive within robots.txt that will be supported by most standard search engines like Google, Bing, Yahoo etc, but the order of execution typically changes for different search providers other than Google

For allowing sub-folders or pages within the disallowed folders, place the ‘ALLOW’ directive before the ‘DISALLOW’ directive.

Also most of the search engines supports pattern matching for these directives providing more control.

Example: Robots.txt

User-Agent: *
Allow: /allowedcontext/
Disallow: /contentNotAllowed/

Example (with pattern matching): Robots.txt

User-Agent: *
Allow: /allowedcontext*/
Disallow: / contentNotAllowed */

We need to identify the list of allowed contexts and disallowed contexts to correctly create the robots.txt file in order to allow/disallow the pages being indexed.

URL Index Removal…

But even though we decided to prevent the bots from storing our content, how do we remove if the content was already indexed before we had implemented robots.txt. Now when we say about removing the index from search engines, every search engine follows a process to get the content to be removed from their indices. Thought of writing this blog on how to place request for removing them from major search engines like Google, Bing and Yahoo searches

In order to remove the indices from Bing, Yahoo or Google, we need to

  • Authenticate oneself as the site owner
  • Submit a removal request with the Search Engine Provider

Following are the steps to place a URL removal request for major search engines like Google Search, Yahoo Search and Bing Search

Google - URL Index Removal

  • Login to web master tool - www.google.com/webmasters/tools using a Google account
  • Add the site for which we request the Index Removal
  • Google would verify if we are the site owners
  • In order to authenticate ourselves as the Site owner, we have to perform one of the following
    • Uploading a verification file to our site
      • Download the verification HTML
      • Place it in the root folder of the site
      • Click on “Verify” and allow the site to be authenticated. May be it takes 24 hrs
    • Adding a Meta Tag to the home page
      • Copy the Meta Tag within the HEADER section
      • Click on “Verify” and allow the site to be authenticated. May be it takes 24hrs
  • Go to web page removals section - www.google.com/webmasters/tools/removals
  • Click on “New Removal Request” button
  • Choose “Information or image that appears in the Google search results.” and click next
  • Choose “The site owner has removed this page/image or blocked it from being indexed by using robots.txt or meta tags” and click next
  • Now type the targeted indexed URL that is appearing on the Google search results.
  • Click on “Submit Request >>” button

Yahoo - URL Index Removal

  • Login to Yahoo! Site Explorer - https://siteexplorer.search.yahoo.com/mysites using a Yahoo account
  • Add the site for which we request the Index Removal
  • Yahoo would verify if we are the site owners
  • In order to authenticate ourselves as the Site owner, we have to perform one of the following
    • Uploading a verification file to our site
      • Download the verification HTML
      • Place it in the root folder of the site
      • Click on “Ready To Authenticate” and allow the site to be authenticated. May be it takes 24 hrs
    • Adding a Meta Tag to the home page
      • Copy the Meta Tag
      • Click on “Ready To Authenticate” and allow the site to be authenticated. May be it takes 24 hrs
  • Locate the site in Explorer results. Notice the Delete URL/Path button next to each URL. Note: When you use Site Explorer to delete a URL/Path from the Yahoo! index, it deletes that URL as well as all the sub-paths listed under that URL
  • Click Delete URL/Path to go to the confirmation page. The confirmation page shows the total number of sub-path URLs that will be affected as a result of that Delete URL/Path action and also displays a list those URLs
  • Use the input text box to edit the URL and limit the delete action to a specific subdirectory. Click Update to regenerate the list of URLs that will be affected by the delete action. Example of deleting multiple URLs: Use the Delete URL/Path option to remove multiple URLs by truncating the URL string back to the trailing ? mark, then clicking the Update button. To remove URLs that look like this: http://example.com/test/index.php?test=foo&user=john, truncate the URL back to the ? mark: http://example.com/test/index.php?
  • Click the Update button to regenerate the list of URLs that will be affected by the delete action
  • Click Yes to delete the URL and any sub-paths listed

Bing - URL Index Removal

  • Go to - http://www.bing.com/webmaster/WebmasterManageSitesPage.aspx using a MSN account
  • Add the site for which we request the Index Removal
  • Bing would verify if we are the site owners
  • In order to authenticate ourselves as the Site owner, we have to perform one of the following
    • Uploading a verification file to our site
      • Download the verification XML
      • Place it in the root folder of the site
      • Click on site name from the list and the site will be authenticated.
    • Adding a Meta Tag to the home page
      • Copy the Meta Tag within the HEADER section
      • Click on site name from the list and the site will be authenticated
  • Launch the Live Search Support form. Go to https://support.discoverbing.com/default.aspx?mkt=en-us&productkey=bingcontentremoval&brand=&&ct=eformts and begin filling it out
  • Identify from where in Live Search you want the URL removed. To quickly remove a URL, select Content Removal Request from the form’s drop-down list. Select one of these resulting options for removal:
  • Remove my content. If you want the URL removed from the SERP, select this option. This is a permanent removal. Should you want this URL indexed again in the future, you will need to fill out a Content Inclusion Request from the same support form.
  • Cache removal. If you just want the cached page removed, use this option. Note that this will not remove the URL from our index.
  • Complete the rest of the form. Submit the URL or URLs to be removed, the query used to find the URL, complete the rest of the form, and then click Submit
Reference Links:

Monday, July 19, 2010

Android: Techy or Non-Techy..It doesnt matter anymore

Whether you are a technical guy with strong programming knowledge or non-technical guy with no programming knowledge/background, not to worry about the underlying skills for developing android based mobile applications.

Sounds strange!!!! yeah its true …

  1. If you are a developer, you can develop Android based apps using the Android SDK, a java based development environment allowing developers to create useful apps for the Android Smartphone Market
  2. If you are not a developer who has’nt programmed a computer before, you can still create Android apps by using the newly launched Google’s App Inventor tool - Beta, a web/browser based development environment uses the concept of visual programming language

Google App Inventor Tool for Android is Google’s experiment for the non-developers enabling them to create apps not just consume apps. It has been under development for a year and user testing has been done mainly in schools with groups targeted users who are not major computer science background.

Key features:

  • It doesn’t require any local installation as completely web based
  • It allows or provides interfaces for developers to use the rich features of drag-n-drop
  • It provides block editors based on OpenBlocks Java Library for creating visual programming languages. The build -in compiler translates the blocks (visual representations) into implementation code that could run on Android.

Screenshots:


Right now as the tool is in Beta stage, you cannot directly get your hands on it immediately, but need to get invites to access and try out. I am yet to get my hands on this graphical SDK-in-a-browser, but have requested one, not sure when will get them.

Downside:

First let me put down my thoughts on this tools downside or possibly could be the one as below

  • Major problem on such kind of model in this case will be easy drag’n'drop development, but no or little idea on the underlying code that could possibly result on poor quality, unreliable, or sometimes insecure app.
  • Also I guess loads and lots of apps will come into play, managing and indentifying which one is the best will be difficult.

Letz see how these downsides will be managed by Google in the long run.

Upside:

  • On the positive note, as mass crowd is targeted here to me it is like the first stepping stone for the students or anyone to get more interested, to enable them better coders in near future and start learning actual Java, maybe one day they will create the next killer app.

Reference Links:


Sunday, July 18, 2010

Android #1: Getting to know the Android basics

Introduction to Android:

Android is an open source software stack that includes operating system, middleware, and key applications with a set of APIs for creating new mobile applications.

Unlike other mobile software stack like iPhone that provides their own proprietary operating system that requires proprietary development tools offering native applications given priority over third party applications and the restriction on access to native phone data, communication across applications, Android software stack provides both native applications (such as personal information management, short messaging service, mobile map, e-mail client, mobile web browser, instant message client, music player, image viewer, etc ) and third party applications (generated by us) sharing the same APIs and runtime, offering an open development environment built on Linux kernel. Thus it provides access to hardware as well as across application interaction.

Android APIs:

Android APIs provide features for handling hardware access, location-based services, background services, map-based services, relational database, p2p messaging and graphics (2D & 3D).

Setting up the Development Environment:

One other good feature of Android is that we can set our development environment on operating systems like Windows, Mac OS, Linux unlike iPhone App development pack that needs the Mac OS to my understanding and knowledge

Following are the step-by-step process of setting up Android Software Development Kit (SDK) for development of Android applications:

  • Install Java Development Kit (JDK) 1.5 or higher version and Apache ANT 1.6.5 or higher
  • Install the Android SDK starter pack for the appropriate operating system
  • Install Eclipse IDE 3.4 or higher version but would recommend going on with Eclipse Classic versions without much of other popular plug-ins to make it light
  • Install the Android Development Tools (ADT) plug-in for the Eclipse IDE

The ADT Eclipse Plug-in actually comes with an Android Emulator which is a virtual mobile emulating device that runs on our computer to prototype, develop and test the Android applications without using a actual physical mobile phone. It actually mimics the hardware and software features of an actual mobile phone except it cannot use the calling and other mobile specific features. To use the emulators, we need to create Android Virtual Device (AVD) configurations that has information's on the Android platform to run.

Screenshots: Android Virtual Devices:

Key Components of Android:

Following are the key components of Android

  • Activities: Are the building blocks of User Interface (UI) and are similar to dialog boxes/windows in a typical desktop application scenario
  • Content Providers: Provides control over the data stored on a device that are accessible by multiple applications. That is, they provide a level of abstraction of data accessible across multiple application
  • Services: Activities and Content Providers are short lived components and can be shut down any time whereas Services are designed to keep running if required as an independent Activity. Example, Services can check for any updates on RSS feed or playing background music even if the controlling Activity is no longer operating
  • Intents: They are like event notifiers thus notifying applications about an event. Example, notifies when a SMS arrives, or SD card inserted into the device etc


Tools: Open Source Java Decompiler

Yet another open source Java Decompiler!!

Java Decompiler Project aims to decompile and analyze Java 5 byte code and the later versions. There are two variants of the tools namely JD-GUI (as a standalone GUI) and JD-Eclipse (as a Eclipse Plug-in) available as free for non-commercial usage meaning cannot be plugged with commercial software products for free. Both these tools uses JD-Core freeware library that is pretty much used to reconstruct the Java source code from “.class” files.

Screenshot:

Some of the core features are

  • Faster Decompilation as the JD-Core & JD-GUI tools are written in C++
  • Supports DnD, new features of Java 5, color coding, etc
  • Works with most current compilers

Reference Links:


Trends: Web Trends - Influential Domains & People

Just looking back on the web revolution, internet has become the de-facto international standard for the global network that created a drastic impact on ones culture and commerce. Internet started as a communication medium through email, text based discussion forums, continues to grow, driven by commerce, huge sharing of online information/knowledge and social networking, never seem to have an end.

To provide a perfect overview of the current internet trends, iA Inc came-up with the web trend map V4 that visualizes the current internet trends on how companies and people fit into. Ofcourse I believe for everyone, the map provides a stunning representation and a very fascinating view of the influential domains and people covering 333 domains and 111 peoples. It has ploted the leading internet names into a form of Tokyo Metro System with different lines of business like Publishing line, Broadcasting line, Entertainment line, news line, application line, etc.

Screenshot: This awesome representation of the state of the web mapped with its trend lines and the top trend rankings is displayed below.

Click on it to view the FULL map.

Reference Links:


Tools: Open Source Java or Java EE Monitoring Software

JavaMelody is a open source Java or Java EE monitoring tool provided by Google to measure and calculate the statistics of application user behavior. The primary objective of this tool is to monitor Java or Java EE applications servers in QA and production environments. It is not a tool to replicate user request on an application but a tool used for analyzing usage of the application by the users.

Feature highlights:

  • Provides overall number of executions, the average execution time, the cpu time and the percentage of errors
  • Provides snapshot of Java Memory and CPU utlization
  • Provides information on number of user sessions and JDBC connections
  • Provides statistical information on http errors, on warnings and errors in logs, on data caches if ehcache used and on batch jobs if quartz used

Reference Links:

Trends: Social Networking Map

There are plenty of social networking sites in market today. Many of us might be interested on which social network is popular among them to understand the trends of social networks. Just to anwser this, recently found out this good representation of the social networks seperated geographically. See below world map (static) showing the most popular social networks based on Google trends for website traffic data. Trends look like now Facebook makes it to the #1 most popularly used among others compartively. Also you can see the shift from Orkut to Facebook also catching the Indian users

Snapshot: Click on it to view the full image

As of Dec 2009,

As of June 2009,

Reference Links:

Article: Geographic Location Services

Long back, I was wondering on how application control users from accessing certain information’s without user based authorization in place. It all started when I used PlayStation 3 to connect online with PlayStation Network for downloading demo contents including games and media contents. I had to set-up an US based account as the service was not available in India. Upon setting up the account, I was able to browse through their catalogues and was even able to download games as I expected but was restricted access for the video store to download high definition media contents. After digging into the issue, found out that they are blocking access to that particular section through Geographic information (IP address) and not with the user account set-up.Another instance that brought me to write this blog was a similar requirement from one of our customer on the need for allowing particular functionality to be accessed only by certain users contracted and not the user outside the contracting market. Application and database being hosted in central environment, customers were looking at making use of a geographical location services based on IP addresses and in fact there are many services available in market. Most of the services gives data online and through API’s.

Following are the few categories of services/tools related to the Geo Information I got to know·

  • IP Locator – For locating the place from where the request came from. Like country, city, region etc. Useful to track user location to customize applications and suggest them the nearby services around their area such as shopping offers, generate site statistic reports based on the visitors to the sites from different countries etc·
  • Proxy Detector - For detecting users who bypass Geo location controls by using proxies to spoof their IP address and location
  • Spam Locator - For locating the geographical location that an email originated from·
  • Trace Route Locator – For locating the geographical location of IP Addresses·
  • Dynamic Redirection of internet surfers – For redirecting the user to the localized sites/geographic content etc·
  • Distance between two cities – To determine the distance between two cities/places

Just a sample to try out!! Following simple JavaScript code will enable us to find the basic Geographic location information’s based on the users current IP address and with the help of third party JavaScript API.

<html>
<head><title>Geo Location - User</title></head>
<script type="text/javascript" src="http://j.maxmind.com/app/geoip.js"></script>
<script>
function GetGeoInfo()
{
var info = document.getElementById('GeoInfo');
var lat = geoip_latitude();
var lon = geoip_longitude();
var city = geoip_city();
var out = '<h3>Information from your IP</h3>'+
'<ul>'+
'<li>Latitude: ' + lat + '</li>'+
'<li>Longitude: ' + lon + '</li>'+
'<li>City: ' + city + '</li>'+
'<li>Region: ' + geoip_region() + '</li>'+
'<li>Region Name: ' + geoip_region_name() + '</li>'+
'<li>Postal Code: ' + geoip_postal_code() + '</li>'+
'<li>Country Code: ' + geoip_country_code() + '</li>'+
'<li>Country Name: ' + geoip_country_name() + '</li>'+
'</ul>'
info.innerHTML = out;
}
</script>
<form name="GeoForm">
<body>
<div id="GeoInfo">Getting the User Geo Information</div>
<script>GetGeoInfo();</script>
</body>
</form>
</html>
HTML Response:Information from your IP
  • Latitude: 13.0833
  • Longitude: 80.2833
  • City: Madras
  • Region: 25
  • Region Name: Tamil Nadu
  • Postal Code:
  • Country Code: IN
  • Country Name: India

Reference Links:


Tools/Frameworks: Open Source Online Shopping Cart Solution

TomatoCart is an open source shopping cart solution developed by Wuxi Elootec Technology Co., Ltd. It is branched from osCommerce 3 as a separate project and is released under the GNU General Public License. Equipped with the web2.0 Technology Ajax and Rich Internet Applications, TomatoCart is devoted to building a landmark eCommerce solution.

Feature highlights: TomatoCart has several significant enhancements based on osCommerce 3:

  • Rich Internet Applications based administration panel
  • Search Engine Optimization
  • Web Analytics (Piwik)
  • Lightweight Framework Content Management System
  • Email System

Key features to highlight that are somewhat differentiating

  • ExtJS Rich Internet Applications Framework - The TomatoCart administration site is completely rewritten based on Ext JS which is a cross-browser JavaScript library for building Rich Internet Applications. It includes many high-performance and customizable UI widgets to simplify work with web applications.
  • Multi-window Environments - Web desktop based application allows users to keep several windows open simultaneously, to enable users to work with several modules such as products, customers and orders at the same time. It mimics user experience of desktop Operating System, offering features and applications similar to a PC environment. So that users can easily start to work with TomatoCart without any difficulty

Technology Stack: TomatoCart can be installed on any server where a web server with PHP has been installed on and has access to a MySQL database server

  • Linux or Windows OS
  • PHP v5.2.0 (with MySQLi extension)
  • MySQL v4.1.13 or v5.0.7
  • Ext JS 2.2.1

TomatoCart Subversion repository is hosted at Google code.

Reference Links:

Tools: Open Source SEO Panel to manage and monitor SEO initiatives

SEO Panel is a complete open source SEO control panel and free software released under GNU General public license to manage and monitor search engine optimization (SEO) of not just one but multiple websites under one umbrella. It provides various SEO tools to increase and track the performance of websites for optimization.

It was released during January 2010 and is gaining popularity because of its rich features among other commercially available tools.

Key Features of SEO Panel:

  • SEO Plug-ins: One of the major feature of SEO Panel is its extensibility feature wherein user using this tool can further extend the features according to their requirements with the help of SEO Panel provided plug-in, third party plug-ins and also develop your own custom plug-ins reviewed by SEO Panel
  • Directory Submission: Automatic directory submission to major internet directories and to check/track them
  • Keyword Position Checker:
    1. Quick Rank Checker feature to check on the search engine position for targeted keywords
    2. Keywords Manager feature to manage targeted keywords
    3. Reporting feature to generate daily, simple and graphical performance reports of targeted keywords in major search engines
  • Search Engine Saturation Checker: Features to identify the number of indexed pages in different major search engines and also provides detailed indexing reports of websites
  • Meta Tag Generator: Feature to create suitable meta-tags for each website
  • Google Site Map Generator: Google sitemap generator to create XML,TEXT and HTML Sitemaps
  • Rank Checker: Features to check, reporting on Google, Alexa page ranks of multiple URLs
  • Backlinks Checker: Feature to check, reporting on the number of backlinks of each website in google,yahoo,msn,altavista and alltheweb
Reference Links:

Thursday, July 15, 2010

Tools: Open Source Project Management Software

OpenProj is a free, open source project management tool and replaces all the commercially avaialble project management tools such us Microsoft Project. It has all equivalent functionality and a familiar user interface as that of MS Project and even opens existing MS Project Plan (mpp) files. Apart from Microsoft OS, it is also available for Linux, Unix, Mac OS. It can be downloaded for free from sourceforge. This product serves as desktop alternative to Microsoft, but also has also similar product named “Projects On Demand” available as Software as a Service (SaaS) project solution through which projects can be managed via the browser with additional features of multi-project, collaboration, management and reporting.

Screenshot:


Reference Links:
http://openproj.org/openproj
http://sourceforge.net/projects/openproj/files