Thursday, July 14, 2011

Android #11: Working with WebViews

WebView is a view that displays web pages. WebViews can be used to render HTML content within your Android application. Typically a WebView uses the Android web kit browser within, but the difference or benefit we achieve is that we can embed HTML content from within our native application. A WebView uses the same rendering and JavaScript engine as the browser, but it runs under the control of your application. Another main feature in this approach is that we can have Activity-to-JavaScript communication possible. That is, a JavaScript function can invoke an Activity function and vice versa.

Embedding a WebView into an application activity

Android platform provides the API for rendering arbitrary HTML within your app by allowing the built-in web browser as a widget within the app. HTML content can come from anywhere, either from any of the below
  • Local HTML files stored in your assets of your Android app
  • Downloaded from the web
  • HTML strings
Here is an example on dealing with the three WebViews embedding three different sources of HTML content (as above) and also demonstrates on how to bind Java and JavaScript code for activity and web content communication


layout/main.xml
<LinearLayout xmlns:android="http://schemas.android.com/apk/res/android"
android:orientation="vertical" android:layout_width="fill_parent"
android:layout_height="fill_parent"> <TextView android:layout_width="fill_parent"
android:layout_height="wrap_content" android:text="WebViewDemo"
android:padding="4dip" android:textSize="16sp" />

<WebView android:id="@+id/webview1" android:layout_width="fill_parent"
android:layout_height="wrap_content" android:layout_weight="0" />

<WebView android:id="@+id/webview2" android:layout_width="fill_parent"
android:layout_height="wrap_content" android:layout_weight="0" />

<WebView android:id="@+id/webview3" android:layout_width="fill_parent"
android:layout_height="wrap_content" android:layout_weight="0" />

</LinearLayout>

WebViewActivity.java
package in.satworks.android.samples.activity;import android.app.Activity;
import android.os.Bundle;
import android.os.Handler;
import android.webkit.JsResult;
import android.webkit.WebChromeClient;
import android.webkit.WebSettings;
import android.webkit.WebView;
import android.webkit.WebViewClient;
import android.widget.Toast;

/** * This class demonstrates on how to embed a WebView in your activity. Also
* demonstrates how to have JavaScript in the WebView call into the activity,
* and how the activity can invoke a JavaScript function.
*/

public class WebViewActivity extends Activity { private WebView mWebView1, mWebView2, mWebView3;
private Handler mHandler = new Handler();

/** Called when the activity is first created. */ @Override
public void onCreate(Bundle savedInstanceState) {
super.onCreate(savedInstanceState);
setContentView(R.layout.main);

// First WebView with HTML Strings
mWebView1 = (WebView) findViewById(R.id.webview1);
mWebView1.loadData("This is plain HTML text string - BOLDED and
COLORED RED
",
"text/html", "utf-8");

// Second WebView with Local HTML file stored under Android Assets
mWebView2 = (WebView) findViewById(R.id.webview2);
mWebView2.setWebChromeClient(new MyWebChromeClient());
mWebView2.loadUrl("file:///android_asset/demo.html");
WebSettings webSettings2 = mWebView2.getSettings();
// By default, the JavaScript support of the WebView object we are
// working with is turned off.
// In order to turn on the web view support for the JavaScript language
// we should call the setJavaScriptEnabled() method.
webSettings2.setJavaScriptEnabled(true);
// register interface class containing methods to be exposed
// to JavaScript. Takes two params namely, java object we need to expose
// and the reference name to use within JavaScript code
mWebView2.addJavascriptInterface(new MyJavaScriptInterface(),
"androidmethodref");

// Third WebView with external HTML reference mWebView3 = (WebView) findViewById(R.id.webview3);
mWebView3.loadUrl("http://www.google.com/");
WebSettings webSettings3 = mWebView3.getSettings();
webSettings3.setJavaScriptEnabled(true);
// Below is required in order to embed the HTML response output within
// the current activity instead of moving out to Android Browser window
mWebView3.setWebViewClient(new MyWebViewClient());

}/**
* WebViewClient provides a way to embed the WebView call of loadUrl within
* the app layout instead of opening a new independent Android browser
* window
*/
final class MyWebViewClient extends WebViewClient {
@Override
public boolean shouldOverrideUrlLoading(WebView view, String url) {
return super.shouldOverrideUrlLoading(view, url);
}

}/**
* WebChromeClient provides a hook for calling "alert" from JavaScript.
* Useful for debugging JavaScript.
*/
final class MyWebChromeClient extends WebChromeClient {
@Override
public boolean onJsAlert(WebView view, String url, String message,
JsResult result) {
System.out.println("This message is from Javascript alert=>"
+ message);
Toast.makeText(
getApplicationContext(),
"Activity to WebView Communication: \n" + message
+ " from JavaScript function", Toast.LENGTH_SHORT)
.show();
result.confirm();
return true;
}
}

/** * JavaScript interface containing methods that can be invoked by the
* JavaScript within HTML. It also in turn invokes the JavaScript method
*/
final class MyJavaScriptInterface {

MyJavaScriptInterface() { }

/** * This method will be invoked via the JavaScript event from within HTML
* through the registered reference name 'androidmethodref'. This is not
* called on the UI thread. Post a runnable to invoke loadUrl on the UI
* thread.
*/
public void clickOnAndroid() {
System.out.println("Method - clickOnAndroid called from Javascript embedded within HTML (demo.html).");
Toast.makeText(
getApplicationContext(),
"WebView to Activity Communication: \nclickOnAndroid: Called from Javascript Event",
Toast.LENGTH_SHORT).show();
mHandler.post(new Runnable() {
// Call to the HTML JavaScript Method
public void run() {
mWebView2.loadUrl("javascript:greetUser()");
}
});
}
}

}

assets/demo.html
<!DOCTYPE HTML>
<html>
<head>
<script type="text/javascript">
// This function is invoked by the Android Activity
function greetUser()
{
alert("Welcome! "+document.forms[0].nameVal.value);
}
</script>
</head>
<form>
<body bgcolor="lavender">
<input type="text" name="nameVal" value="Sat"/>
<!-- Calls into the JavaScript interface for the activity //-->
<input type="button" value="Greet User" onClick="window.androidmethodref.clickOnAndroid()"/>
</body>
</form>
</html>

values/strings.xml
<?xml version="1.0" encoding="utf-8"?>
<resources>
<string name="app_name">WebViewApp</string>
</resources>

AndroidManifest.xml
<?xml version="1.0" encoding="utf-8"?>
<manifest xmlns:android="http://schemas.android.com/apk/res/android"
package="in.satworks.android.samples.activity" android:versionCode="1"
android:versionName="1.0">
<application android:icon="@drawable/icon" android:label="@string/app_name">
<activity android:name=".WebViewActivity" android:label="@string/app_name">
<intent-filter>
<action android:name="android.intent.action.MAIN" />
<category android:name="android.intent.category.LAUNCHER" />
</intent-filter>
</activity>
</application>
<uses-sdk android:minSdkVersion="8" />

<uses-permission android:name="android.permission.INTERNET"></uses-permission></manifest>

Reference:

Android #10: Working with Android Services

Activities and Content Providers are short lived components and can be shut down any time whereas Services are designed to keep running if required as an independent Activity. For example, they can check for any updates on RSS feed or playing background music even if the controlling Activity is no longer operating. So in order to create a application that runs on background of other current activities, one need to create a service.

Services are of two categories

  1. Unbound Services – They are services that run in background indefinitely. That is, unbound service is one which gets initiated when an activity is started and continues to run even when that activity is closed.

  2. Bound Services – They are services that run in background at the lifespan of a calling activity. That is, bound service is one which gets initiated when an activity is started and destroys or its life span ends when that activity is closed.
Working with Unbound Services:

Here is an example of unbound service that will be initiated by an application activity and even after that activity is closed, will find the service to be running in background.


layout/main.xml
<?xml version="1.0" encoding="utf-8"?>

<LinearLayout xmlns:android="http://schemas.android.com/apk/res/android"

android:orientation="vertical" android:layout_width="fill_parent"

android:layout_height="fill_parent" android:gravity="center">

<TextView android:layout_width="fill_parent"

android:layout_height="wrap_content" android:text="Activity UnBound Services Demo"

android:textSize="20sp" android:padding="10dp" />

<Button android:layout_width="fill_parent"

android:layout_height="wrap_content" android:id="@+id/buttonStart"

android:text="Create/Start UnBound Service"></Button>

<Button android:layout_width="fill_parent"

android:layout_height="wrap_content" android:text="Stop UnBound Service" android:id="@+id/buttonStop">
</Button>

</LinearLayout>

SimpleActivityUnBoundService.java
package in.satworks.android.samples.service;import android.app.Service;

import android.content.Intent;

import android.os.IBinder;

import android.widget.Toast;

public class SimpleActivityUnBoundService extends Service {
 @Override

public IBinder onBind(Intent arg0) { return null;

}

@Override
// Service Created - Called only one time when when the service is first created

public void onCreate() {super.onCreate();

Toast.makeText(this, "Service onCreate called: Service Created", 3).show();}

@Override
// Service Stopped - Called when the service is destroyed

public void onDestroy() {super.onDestroy();

Toast.makeText(this, "Service onDestroy called: Service Stopped", 3).show();}

@Override
// Service Started - Called every time when user tries to start the same service

public void onStart(Intent intent, int startId) {super.onStart(intent, startId);

Toast.makeText(this, "Service onStart called: Service Started", 3).show();}

}

ServiceDemoActivity.java
package in.satworks.android.samples.activity;
import in.satworks.android.samples.R;
import in.satworks.android.samples.service.SimpleActivityUnBoundService;

import android.app.Activity;

import android.content.Intent;

import android.os.Bundle;

import android.view.View;

import android.view.View.OnClickListener;

import android.widget.Button;

import android.widget.Toast;

public class ServiceDemoActivity extends Activity implements OnClickListener{

Button buttonStart, buttonStop;

@Override

public void onCreate(Bundle savedInstanceState) {

super.onCreate(savedInstanceState);

setContentView(R.layout.main);

buttonStart = (Button) findViewById(R.id.buttonStart);

buttonStop = (Button) findViewById(R.id.buttonStop);

buttonStart.setOnClickListener(this);

buttonStop.setOnClickListener(this);

}

@Override
public void onClick(View v) {

switch (v.getId()) {

case R.id.buttonStart:

startService(new Intent(this, SimpleActivityUnBoundService.class));

break;

case R.id.buttonStop:

stopService(new Intent(this, SimpleActivityUnBoundService.class));

break;

}

}

@Override protected void onDestroy() {

super.onDestroy();

Toast.makeText(this, "Calling Activity Destoyed", 3).show();

}

}

values/strings.xml
<?xml version="1.0" encoding="utf-8"?>

<resources>

<string name="app_name">ServiceDemoApp</string>

</resources>

AndroidManifest.xml
<?xml version="1.0" encoding="utf-8"?>

<manifest xmlns:android="http://schemas.android.com/apk/res/android"

package="in.satworks.android.samples" android:versionCode="1"

android:versionName="1.0">
<application android:icon="@drawable/icon" android:label="@string/app_name">
<activity android:name=".activity.ServiceDemoActivity" android:label="@string/app_name">

<intent-filter>

<action android:name="android.intent.action.MAIN" />

<category android:name="android.intent.category.LAUNCHER" />

</intent-filter>

</activity>

<service android:enabled="true" android:name=".service.SimpleActivityUnBoundService" />

</application>

<uses-sdk android:minSdkVersion="8" />

</manifest>

Working with Bound Services:

Here is an example of bound service that will be initiated by an application activity and its lifecycle ends when the activity is closed.


layout/main.xml
<?xml version="1.0" encoding="utf-8"?>

<LinearLayout xmlns:android="http://schemas.android.com/apk/res/android"

android:orientation="vertical" android:layout_width="fill_parent"

android:layout_height="fill_parent" android:gravity="center">

<TextView android:layout_width="fill_parent"

android:layout_height="wrap_content" android:text="Activity Bound Services Demo"

android:textSize="20sp" android:padding="10dp" />

<Button android:layout_width="fill_parent"

android:layout_height="wrap_content" android:id="@+id/buttonStart"

android:text="Start"></Button>

</LinearLayout>

SimpleActivityBoundService.java
package in.satworks.android.samples.service;import android.app.Service;

import android.content.Intent;

import android.os.IBinder;

import android.widget.Toast;

public class SimpleActivityBoundService extends Service { @Override

public IBinder onBind(Intent arg0) {

return null;

}

@Override // Service Created - Called only one time when when the service is first created

public void onCreate() {

super.onCreate();

Toast.makeText(this, "Service onCreate called: Service Created", 3).show();

}

@Override // Service Stopped - Called when the service is destroyed

public void onDestroy() {

super.onDestroy();

Toast.makeText(this, "Service onDestroy called: Service Stopped", 3).show();

}

}

ServiceDemoActivity.java
package in.satworks.android.samples.activity;import in.satworks.android.samples.R;

import in.satworks.android.samples.service.SimpleActivityBoundService;

import android.app.Activity;

import android.content.Intent;

import android.os.Bundle;

import android.view.View;

import android.view.View.OnClickListener;

import android.widget.Button;

import android.widget.Toast;

public class ServiceDemoActivity extends Activity implements OnClickListener{
Button buttonStart;

@Override public void onCreate(Bundle savedInstanceState) {

super.onCreate(savedInstanceState);

setContentView(R.layout.main);

buttonStart = (Button) findViewById(R.id.buttonStart);

buttonStart.setOnClickListener(this);

}

@Override public void onClick(View v) {

switch (v.getId()) {

case R.id.buttonStart:

bindService(new Intent(this, SimpleActivityBoundService.class), null, BIND_AUTO_CREATE);

break;

}

}

@Override protected void onDestroy() {

super.onDestroy();

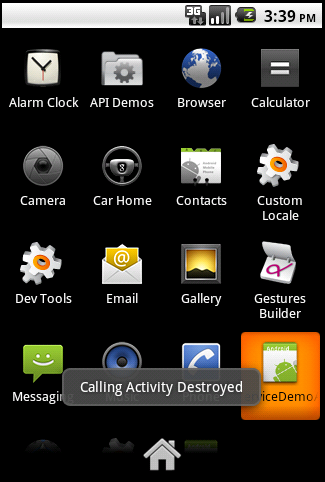
Toast.makeText(this, "Calling Activity Destroyed", 3).show();

}

}

values/strings.xml
<?xml version="1.0" encoding="utf-8"?>

<resources>

<string name="app_name">ServiceDemoApp</string>

</resources>

AndroidManifest.xml
<?xml version="1.0" encoding="utf-8"?>

<manifest xmlns:android="http://schemas.android.com/apk/res/android"

package="in.satworks.android.samples" android:versionCode="1"

android:versionName="1.0">
<application android:icon="@drawable/icon" android:label="@string/app_name">
<activity android:name=".activity.ServiceDemoActivity" android:label="@string/app_name">

<intent-filter>

<action android:name="android.intent.action.MAIN" />

<category android:name="android.intent.category.LAUNCHER" />

</intent-filter>

</activity>

<service android:enabled="true" android:name=".service.SimpleActivityBoundService" />

</application>

<uses-sdk android:minSdkVersion="8" />

</manifest>

Best Practices: Cross-Context Dispatching and Session Handling

It’s been quite some time since I blogged. Thought of blogging this topic as recently we had faced a similar kind of problem that was faced earlier in another project. Just before going on to the problem and solution, let us first understand few basics and then move forward.

Understanding Session Tracking and JSESSIONID:

Basically a web container can use several methods to associate a session with a user, all of which involve passing an identifier between the client and the server. The identifier can be maintained on the client as a cookie, or the web component can include the identifier in every URL that is returned to the client.

JSESSIONID is a unique identifier of the HTTP session generated by the web container, stored within the cookie and is also the default cookie name. JSESSIONID cookie is created/sent when session is created. If cookies are turned off, the identifier is encoded in the URL link and if the cookies are turned on, the URL is simply empty and the identifier is available in the cookie itself.

Another misconception is that session gets created during first request which is not actually the case and totally up to the code to determine on when it should be created. To better understand this behavior,

  • In Java Servlet, new session is created when your code calls request.getSession() or request.getSession(true) for the first time. If you just want to get session if exists and do not want to create it if it doesn't exists, use request.getSession(false) that will return you a session if exists or null if it doesn’t. In this case, new session is not created and JSESSIONID cookie is not sent to the client browser that also means the session is not necessarily created on first request.

  • In JSP, new session is created whenever a call is made to the JSP page for the first time and uses the already available session for other subsequent requests. If we need to turn off this feature in a particular JSP page, use session=”false” page directive in which case session variable is not available on that JSP page at all.


Problem Description:

In case there are two or more different web application contexts accessed by the same user from the same domain, each request from the same user will generate cookie with its own session id that will get overridden and loose the session it had already set up.

By default all popular browser has the parent (main) window and the child (pop-up) window sharing the same cookie whenever the session is tracked using cookies. Assume the scenario where there are two different web applications deployed under the same server domain and each are accessed via their own context roots, the parent window accesses the first application and child window with the second application. In this case, as parent window and child window accesses two different applications from the same domain, session information gets overridden because the cookie name is same and the new Identifier (JSESSIONID) named cookie gets overridden due to which parent window looses it session data.

For instance, we had two different applications (say for example /app1 and /app2) running under the same domain (say for example http://www.samedomain.com/), parent window accesses the first application (http://www.samedomain.com/app1/) and through it, opens a child window with the second application (http://www.samedomain.com/app2) . When the parent window opens, it creates a cookie named with JSESSIONID and stores client session related information. As soon as the child window is opened, the existing session gets overridden by the app2 session as cookie names are same resulting in loss of session data in parent screen. Post this, whenever user navigates within parent screen for anything session specific will not fetch them the required data.

Solution Description:

Any of the below two approaches can be employed to prevent the session override problem

  1. Changing the cookie name from default value.

  2. Changing the cookie path (in case certain application server doesn’t allow to change the cookie name, we can create the same JSESSIONID named cookie into two different paths thus a work around way to prevent the override issue)


As each web container implementation differs even though they follow the same specification, above approaches can be employed using their proprietary configurations. Below are two different examples through which the above problem can be solved.

Illustration by Examples:

In Weblogic Application Server, changing the cookie name from default value. Suppose we have two applications deployed on Weblogic Application server, we can change the cookie name from its default JSESSIONID named cookie. This way, we can create application-specific cookies to avoid cookie override that in turn avoids the HTTP session override issue. Modify the weblogic.xml configuration specific to each application as below

<session-descriptor>
<session-param>
<param-name>CookieName</param-name>
<param-value>App1Cookie</param-value>
</session-param>
</session-descriptor>

By changing the cookie name, we ensure two different cookies created for each applications, thus ensuring that app1 and app2 sessions doesn't get overridden.

In Tomcat Web Server or JBoss Application server, changing the cookie path. We have the property named emptySessionPath used by the Apache connector’s configuration that states whether all cookie should be stored in the root folder “/” or not (otherwise) . This way, we can have cookies placed in two different location to avoid cookie override that in turn avoids HTTP session override issue. If emptySessionPath is enabled and set as “true” in Tomcat or JBoss, the JSESSIONID cookie is written to the root "/" path. If emptySessionPath is set to “false”, there are multiple cookies in the browser, one for each web app (none at the root), so different web apps are not re-writing each other's cookie. Modify the server.xml configuration specific to each application as below


<Connector port="8080" address="${jboss.bind.address}"maxThreads="5" maxHttpHeaderSize="8192"
emptySessionPath="false" protocol="HTTP/1.1" enableLookups="false" redirectPort="8443"
acceptCount="100" connectionTimeout="20000" disableUploadTimeout="true" />
<Connector port="8009" address="${jboss.bind.address}" protocol="AJP/1.3"
maxThreads="200" emptySessionPath="false" enableLookups="false" redirectPort="8443" />

By changing the emptySessionPath to "false", we ensure that the session cookies of app1 gets created at “/app1” instead of the default path of “/”, thus ensuring that app1 and app2 sessions doesn't get overridden.

Wednesday, April 27, 2011

Dynamic views of my blog

Just got to know that my blog can be viewed with different look and feel. Blogger currently offers five dynamic views for its public blogs. These views are only accessible if allowed for by the blog author.

  • Flipcard: http://satworks.blogspot.com/view/flipcard
  • Mosaic: http://satworks.blogspot.com/view/mosaic
  • Sidebar: http://satworks.blogspot.com/view/sidebar
  • Snapshot: http://satworks.blogspot.com/view/snapshot
  • Timeslide: http://satworks.blogspot.com/view/timeslide
  • Monday, January 3, 2011

    Mobilizing Existing Application Architecture

    When we say mobilizing existing enterprise applications, we just don’t talk about creating a mobile client that connects or communicates with the back-end enterprise systems for data. But often requires modifying and/or extending the existing enterprise application architecture with many components working together to support multiple platform devices.

    Following high level architecture represents the logical view and can be used as reference architecture in extending the design of the existing architecture to a mobile based application for the enterprise world.


    Enterprise System Tier:

    Enterprise System Tier may constitutes the existing enterprise applications. Many flavors of enterprise applications such as Content Management Systems (CMS), Customer Relation Management (CRM), Enterprise Resource Planning (ERP), Business Intelligence (BI), Web Enterprise Architectures exists today that can be extended to mobile devices.

    Web enterprise applications within itself may follow a three or N tier architecture (presentation tier, application tier, database tier) with one or more layers (presentation layer, business layer, data access layer) within each tier.

    Middle Tier:

    Middle Tier constitutes the middleware that integrates the client application to the EIS tier. As most of the enterprise application architecture does not directly work with or run on devices, there comes the need for a middleware (mobile middleware) that makes the enterprise application data to be accessed by the mobile devices. They serve as an abstraction layer between the mobile device and the enterprise application.

    They are typically services/web services (may be restful web services) or can have its own service oriented architecture (SOA) and also contain mobile templates that can be used to extend the enterprise applications like CMS, CRM, BI, and ERP with the data transformed/rendered into the mobile interface. They contain the content adapters, framework wrappers, content processor/transformers that connects the enterprise data and the mobile application.

    For Web based enterprise applications, we can actually enhance the existing architecture within its abstraction layer to support data sharing to mobile devices instead of this separate middle tier.

    Client Tier:

    Client Tier constitutes the actual mobile client applications and the run times. They are typically the software or programs that run on the mobile devices. The client tier itself may have either no layers or one to three layers of application code based on the platform needs of the mobile application.
    There are three client application architecture options that can be chosen based on requirements and other factors.

    There are three client application architecture options that can be chosen based on requirements and other factors.

    Thin Client Application Architecture:

    This architecture can be chosen when we have to do deal with developing online applications. It is useful in situation where connectivity is guaranteed. Here the client software/program is normally the browser and has no custom application code and relies completely on the enterprise systems for data.
    • Typically has no custom application code

    • Cannot operate independently from server as it completely relies on server for functionality

    • No dependency on the mobile OS and typically use web/wap browser to display HTML, XML and WML contents
    Pros:
    • Easy to maintain/support since there are no application code or data on client side

    • No distribution mechanism or application code release needed for any kind of enhancements as the application business logic resides on the server
    Cons:
    • Always should be in online mode wherein to have constant communication with the server. So mobile application will not work without connectivity.
    Thick/Fat Client Application Architecture:

    This architecture can be chosen when we have to deal with developing offline applications. It is useful in situation where connectivity is not guaranteed. Here the client software/program is installed locally to the device that holds all required data either completely independent of any servers or for most duration and synchronizes data with server at a pre-configured time period or at the end of day whenever connectivity resumes.
    • Typically have one to three layers of custom application code. So native application has to be developed that depends on the mobile OS.
    • Can operate independently from server either completely or for certain period of time
    Pros:
    • Application will work even there is limited connectivity or no connectivity
    Cons:
    • Distribution mechanism or application code release can be difficult as it heavily depends on the mobile OS
    • If we have multi-versions of the application, it would be difficult to maintain or provide support for all versions
    Interactive/Smart Client Application Architecture:

    This architecture can be chosen when we have to deal with developing occasionally connected application. It is useful in situations where connectivity bandwidth is not used all times but whenever required. Here the client software/program is installed locally to the device like fat client, but the application can update or refresh data anytime as against any pre-configured time even though the connectivity is on. That is, synchronizes data with server on need basis only when required.
    • Typically have one to three layers of custom application code. So native application has to be developed that depends on the mobile OS
    Pros:
    • Application will work even there is limited connectivity or no connectivity but the difference here as compared with fat client architecture is that data synchronization happens on need basis when required or whenever there is a update on data is available
    Cons:
    • Distribution mechanism or application code release can be difficult as it heavily depends on the mobile OS but comparatively easier as against fat client models as we can control on what needs to be coded on server and what on client.
    • If we have multi-versions of the application, it would be difficult to maintain or provide support for all versions
    Design Considerations:

    As most of the enterprise web architectures currently available were implemented long before even mobile applications existed or were considered, the need to accommodate the extension of enterprise application to the mobile has the following considerations while design an architecture
    • Connectivity Type: Mobile devices can operate on three connection modes namely 1: Always Connected, 2: Partially Connected & 3: Never Connected. This will play a key role in defining the architecture as only based on this factor; we will have to decide on how the mobile client application would be out of the three thin, fat and smart client models. This affects the way in which data is synchronized between the enterprise app and the mobile client.

    • Data Synchronization: As described above, data synchronization between the mobile client app and the enterprise app plays a key role as well in defining the architecture. It is achieved in either of two ways.
    1. Continuous Synchronous/Asynchronous Communication: Data synchronization between the mobile client and server is continuous where in case of synchronous communication, all data is completely stored before server acknowledges the receipt of data and in case of asynchronous communication, all data need not be completely stored before the server acknowledges the client (ie., server acknowledges immediately when the request comes to it and later carries the store request)
    2. Store-and-Forward Communication: Whenever there is no connectivity, data gets stored within the mobile client local data store and then upon connectivity, data synchronization takes place between mobile client and server. In case of the data retrieval from server, the server uses push-to-messaging to push notifications/messages from the server to the client whenever client is online and rest of the time uses the local data during offline.
    • Abstraction Level: Level of Abstraction of existing application should be considered before an architecture solution is achieved. If there is a clear separation of presentation, business, and data access logic, then it would be easier to mobilize the application as reuse of the existing business and data access components is possible as compared against the writing lot of code/work if the existing application is not well-abstracted.
    • Application Version: Modified version of the application or new application should also be considered while defining a mobile architecture. If we go with a fat/smart client based architecture, then the mobile application we develop will be a scale-down version of the actual server application as some part of the server logic will be developed within the mobile application.

    • Location Based Content: Location based content delivery provides targeted content such as advertisements, information, maps, news to devices based on current physical location. So while defining a architecture, gather information on or clearly separate the different contents that are generic and location based.

    Thursday, December 23, 2010

    Android #9: Working with Android Intents - Part 4

    Refer the previous post to get background on Intents - http://satworks.blogspot.com/2010/12/android-6-working-with-android-intents.html

    Explicit Intents with return example: This example demonstrates the inter-activity communication and will show on invoking user defined custom activities from one activity but instead of passing the control to the invoked activity, will stay on the current invoking activity with values updated from invoked activity


    layout/main.xml
    <?xml version="1.0" encoding="utf-8"?>
    <LinearLayout xmlns:android="http://schemas.android.com/apk/res/android"
    android:orientation="vertical" android:layout_width="fill_parent"
    android:layout_height="fill_parent">
    <TextView android:id="@+id/btnMsgId" android:layout_width="fill_parent"
    android:layout_height="wrap_content" android:text="@string/msg" />
    <Button android:id="@+id/btnRtnId" android:layout_width="fill_parent"
    android:layout_height="wrap_content" android:text="@string/invokeRtnBtn" />
    </LinearLayout>
    BaseInvokingActivity.java
    package in.satworks.android.samples.activity;

    import android.app.Activity;
    import android.content.Intent;
    import android.os.Bundle;
    import android.view.View;
    import android.view.View.OnClickListener;
    import android.widget.Button;
    import android.widget.Toast;

    public class BaseInvokingActivity extends Activity {
    /** Called when the activity is first created. */
    @Override
    public void onCreate(Bundle savedInstanceState) {
    super.onCreate(savedInstanceState);
    setContentView(R.layout.main);
    // Invoke other activity and Return
    Button invokeRtnBtn = (Button) findViewById(R.id.btnRtnId);
    invokeRtnBtn.setOnClickListener(new OnClickListener() {
    @Override
    public void onClick(View arg0) {
    Intent explicitIntent = new Intent(BaseInvokingActivity.this,
    OtherInvokedActivity.class);
    explicitIntent.putExtra("FromBaseInvokingActivity",
    "Initial Value from FromBaseInvokingActivity");
    startActivityForResult(explicitIntent, 1);
    }
    });
    }
    /** Called when an activity called by using startActivityForResult finishes. */
    @Override
    public void onActivityResult(int requestCode, int resultCode, Intent data) {
    Bundle extras = data.getExtras();
    String returnVal = (String) extras.get("OtherInvokedActivity");
    Toast.makeText(BaseInvokingActivity.this, returnVal, Toast.LENGTH_SHORT)
    .show();
    }
    }
    OtherInvokedActivity.java
    package in.satworks.android.samples.activity;

    import android.app.Activity;
    import android.content.Intent;
    import android.os.Bundle;

    public class OtherInvokedActivity extends Activity {
    /** Called when the activity is first created. */
    @Override
    public void onCreate(Bundle savedInstanceState) {
    super.onCreate(savedInstanceState);
    setContentView(R.layout.main);
    Intent intent=getIntent();
    Bundle extras=intent.getExtras();
    String val=(String)extras.get("FromBaseInvokingActivity");
    Intent modifiedIntent=new Intent();
    modifiedIntent.putExtra("OtherInvokedActivity", val+":\nNow modified with this text included from OtherInvokedActivity");
    setResult(1, modifiedIntent);
    finish();
    }
    }
    values/strings.xml
    <?xml version="1.0" encoding="utf-8"?>
    <resources>
    <string name="app_name">ExplicitIntentsApp</string>
    <string name="msg">BaseInvokingActivity!</string>
    <string name="otherMsg">OtherInvokedActivity!</string>
    <string name="invokeRtnBtn">Invoke Other Activity and Return</string>
    </resources>
    AndroidManifest.xml
    <?xml version="1.0" encoding="utf-8"?>
    <manifest xmlns:android="http://schemas.android.com/apk/res/android"
    package="in.satworks.android.samples.activity" android:versionCode="1"
    android:versionName="1.0">
    <application android:icon="@drawable/icon" android:label="@string/app_name">
    <activity android:name=".BaseInvokingActivity" android:label="@string/app_name">
    <intent-filter>
    <action android:name="android.intent.action.MAIN" />
    <category android:name="android.intent.category.LAUNCHER" />
    </intent-filter>
    </activity>
    <activity android:label="@string/app_name" android:name=".OtherInvokedActivity"></activity>
    </application>
    <uses-sdk android:minSdkVersion="8" />
    </manifest>

    Monday, December 20, 2010

    Android #8: Working with Android Intents - Part 3

    Refer the previous post to get background on Intents - http://satworks.blogspot.com/2010/12/android-6-working-with-android-intents.html

    Explicit Intents example: This example demonstrates the inter-activity communication and will show on invoking user defined custom activities from one activity


    layout/main.xml
    <?xml version="1.0" encoding="utf-8"?>
    <LinearLayout xmlns:android="http://schemas.android.com/apk/res/android"
    android:orientation="vertical" android:layout_width="fill_parent"
    android:layout_height="fill_parent">
    <TextView android:layout_width="fill_parent"
    android:layout_height="wrap_content" android:text="@string/msg" />
    <Button android:id="@+id/btnId" android:layout_width="fill_parent"
    android:layout_height="wrap_content" android:text="@string/invokeBtn" />
    </LinearLayout>
    layout/otherinvoked.xml
    <?xml version="1.0" encoding="utf-8"?>
    <LinearLayout xmlns:android="http://schemas.android.com/apk/res/android"
    android:orientation="vertical" android:layout_width="fill_parent"
    android:layout_height="fill_parent">
    <TextView android:id="@+id/otherMsgId" android:layout_width="fill_parent"
    android:layout_height="wrap_content" android:text="@string/otherMsg" />
    </LinearLayout>
    BaseInvokingActivity.java
    package in.satworks.android.samples.activity;
    import android.app.Activity;
    import android.content.Intent;
    import android.os.Bundle;
    import android.view.View;
    import android.view.View.OnClickListener;
    import android.widget.Button;

    public class BaseInvokingActivity extends Activity {
    /** Called when the activity is first created. */
    @Override
    public void onCreate(Bundle savedInstanceState) {
    super.onCreate(savedInstanceState);
    setContentView(R.layout.main);
    // Invoke other activity
    Button invokeBtn=(Button)findViewById(R.id.btnId);
    invokeBtn.setOnClickListener(new OnClickListener() {
    @Override
    public void onClick(View arg0) {
    Intent explicitIntent=new Intent(BaseInvokingActivity.this, OtherInvokedActivity.class);
    explicitIntent.putExtra("FromBaseInvokingActivity", "Value from FromBaseInvokingActivity");
    startActivity(explicitIntent);
    }
    });
    }
    }
    OtherInvokedActivity.java
    package in.satworks.android.samples.activity;

    import android.app.Activity;
    import android.content.Intent;
    import android.os.Bundle;
    import android.widget.TextView;

    public class OtherInvokedActivity extends Activity {
    /** Called when the activity is first created. */
    @Override
    public void onCreate(Bundle savedInstanceState) {
    super.onCreate(savedInstanceState);
    setContentView(R.layout.otherinvoked);
    Intent intent=getIntent();
    Bundle extras=intent.getExtras();
    String val=(String)extras.get("FromBaseInvokingActivity");
    TextView txtView=(TextView)findViewById(R.id.otherMsgId);
    txtView.setText("OtherInvokedActivity: "+val);
    }
    }
    values/strings.xml
    <?xml version="1.0" encoding="utf-8"?><resources>
    <string name="app_name">ExplicitIntentsApp</string>
    <string name="msg">BaseInvokingActivity!</string>
    <string name="otherMsg">OtherInvokedActivity!</string>
    <string name="invokeBtn">Invoke Other Activity</string>
    </resources>
    AndroidManifest.xml
    <?xml version="1.0" encoding="utf-8"?>
    <manifest xmlns:android="http://schemas.android.com/apk/res/android"
    package="in.satworks.android.samples.activity" android:versionCode="1"
    android:versionName="1.0">
    <application android:icon="@drawable/icon" android:label="@string/app_name">
    <activity android:name=".BaseInvokingActivity" android:label="@string/app_name">
    <intent-filter>
    <action android:name="android.intent.action.MAIN" />
    <category android:name="android.intent.category.LAUNCHER" />
    </intent-filter>
    </activity>
    <activity android:label="@string/app_name" android:name=".OtherInvokedActivity"></activity>
    </application>
    <uses-sdk android:minSdkVersion="8" />
    </manifest>

    Android #7: Working with Android Intents - Part 2

    Refer the previous post to get background on Intents - http://satworks.blogspot.com/2010/12/android-6-working-with-android-intents.html

    Implicit Intents example: Following example demonstrates the inter-activity communication and will show on invoking some of the built-in Android activities from one activity


    layout/main.xml
    <?xml version="1.0" encoding="utf-8"?>
    <LinearLayout xmlns:android="http://schemas.android.com/apk/res/android"
    android:orientation="vertical" android:layout_width="fill_parent"
    android:layout_height="fill_parent">
    <TextView android:layout_width="fill_parent"
    android:layout_height="wrap_content" android:text="@string/msg" />
    <Button android:id="@+id/btnDialId" android:layout_width="fill_parent"
    android:layout_height="wrap_content" android:text="@string/btnDialTxt"
    android:gravity="right|center_vertical" />
    <Button android:id="@+id/btnCallId" android:layout_width="fill_parent"
    android:layout_height="wrap_content" android:text="@string/btnCallTxt"
    android:gravity="right|center_vertical" />
    <Button android:id="@+id/btnSMSId" android:layout_width="fill_parent"
    android:layout_height="wrap_content" android:text="@string/btnSMSTxt"
    android:gravity="right|center_vertical" />
    <Button android:id="@+id/btnSearchId" android:layout_width="fill_parent"
    android:layout_height="wrap_content" android:text="@string/btnSearchTxt"
    android:gravity="right|center_vertical" />
    <Button android:id="@+id/btnBrowseId" android:layout_width="fill_parent"
    android:layout_height="wrap_content" android:text="@string/btnBrowseTxt"
    android:gravity="right|center_vertical" />
    <Button android:id="@+id/btnGoogleMapId" android:layout_width="fill_parent"
    android:layout_height="wrap_content" android:text="@string/btnGoogleMapTxt"
    android:gravity="right|center_vertical" />
    <Button android:id="@+id/btnViewContactsId"
    android:layout_width="fill_parent" android:layout_height="wrap_content"
    android:text="@string/btnViewContactsTxt" android:gravity="right|center_vertical" />
    </LinearLayout>

    ImplicitIntentsActivity.java
    package in.satworks.android.samples.activity;

    import android.app.Activity;
    import android.app.SearchManager;
    import android.content.Intent;
    import android.net.Uri;
    import android.os.Bundle;
    import android.provider.ContactsContract;
    import android.view.View;
    import android.view.View.OnClickListener;
    import android.widget.Button;

    public class ImplicitIntentsActivity extends Activity {
    /** Called when the activity is first created. */
    @Override
    public void onCreate(Bundle savedInstanceState) {
    super.onCreate(savedInstanceState);
    setContentView(R.layout.main);
    // To Dial a number
    launchDialer();
    // To Call a Number
    // Requires android.permission.CALL_PHONE
    callNumber();
    // To SMS a Number
    launchSMS();
    // To perform local search
    performLocalSearch();
    // To open browser with URL
    launchBrowser();
    // To launch Google Maps
    showGoogleMap();
    // To View existing contacts stored in phone
    showContacts();
    }

    // To View existing contacts stored in phone
    private void showContacts() {
    Button viewContacts = (Button) findViewById(R.id.btnViewContactsId);
    viewContacts.setOnClickListener(new OnClickListener() {
    @Override
    public void onClick(View v) {
    Intent contacts = new Intent();
    contacts.setAction(android.content.Intent.ACTION_VIEW);
    contacts.setData(ContactsContract.Contacts.CONTENT_URI);
    startActivity(contacts);
    }
    });

    }

    // To launch Google Maps
    private void showGoogleMap() {
    Button googleMapBtn = (Button) findViewById(R.id.btnGoogleMapId);
    googleMapBtn.setOnClickListener(new OnClickListener() {
    @Override
    public void onClick(View v) {
    Intent intent = new Intent(Intent.ACTION_VIEW, Uri
    .parse("geo:13.05,80.20"));
    startActivity(intent);
    }
    });
    }

    // Open a browser window to the URL specified.
    private void launchBrowser() {
    Button browseBtn = (Button) findViewById(R.id.btnBrowseId);
    browseBtn.setOnClickListener(new OnClickListener() {
    @Override
    public void onClick(View v) {
    Intent intent = new Intent(Intent.ACTION_VIEW, Uri
    .parse("http://www.android.com"));
    startActivity(intent);
    }
    });
    }

    // Perform local search
    private void performLocalSearch() {
    Button searchBtn = (Button) findViewById(R.id.btnSearchId);
    searchBtn.setOnClickListener(new OnClickListener() {
    @Override
    public void onClick(View v) {
    Intent intent = new Intent(Intent.ACTION_SEARCH);
    intent.putExtra(SearchManager.QUERY, "Test");
    startActivity(intent);
    }
    });
    }

    // To launch SMS
    private void launchSMS() {
    Button smsBtn = (Button) findViewById(R.id.btnSMSId);
    smsBtn.setOnClickListener(new OnClickListener() {
    @Override
    public void onClick(View v) {
    Intent intent = new Intent(Intent.ACTION_SENDTO, Uri
    .parse("sms:123456789"));
    intent.putExtra("sms_body", "Test SMS message.....");
    startActivity(intent);
    }
    });
    }

    // Calls the entered phone number.
    private void callNumber() {
    Button callBtn = (Button) findViewById(R.id.btnCallId);
    callBtn.setOnClickListener(new OnClickListener() {
    @Override
    public void onClick(View v) {
    Intent intent = new Intent(Intent.ACTION_CALL, Uri
    .parse("tel:123456789"));
    startActivity(intent);
    }
    });
    }

    // Dials (but does not actually initiate the call) the number given
    private void launchDialer() {
    Button dialBtn = (Button) findViewById(R.id.btnDialId);
    dialBtn.setOnClickListener(new OnClickListener() {
    @Override
    public void onClick(View v) {
    Intent intent = new Intent(Intent.ACTION_DIAL, Uri
    .parse("tel:123456789"));
    startActivity(intent);
    }
    });
    }
    }

    values/strings.xml
    <?xml version="1.0" encoding="utf-8"?>
    <resources>
    <string name="app_name">ImplicitIntentsApp</string>
    <string name="msg">ImplicitIntentsActivity! \nTry out few of the predefined intents\n</string>
    <string name="btnDialTxt">Launch Dialer</string>
    <string name="btnCallTxt">Launch Call</string>
    <string name="btnSMSTxt">Launch SMS</string>
    <string name="btnSearchTxt">Launch Search</string>
    <string name="btnBrowseTxt">Launch Browser</string>
    <string name="btnGoogleMapTxt">Launch Google Map</string>
    <string name="btnViewContactsTxt">Launch Phone Contacts</string>
    </resources>

    AndroidManifest.xml
    <?xml version="1.0" encoding="utf-8"?>
    <manifest xmlns:android="http://schemas.android.com/apk/res/android"
    package="in.satworks.android.samples.activity" android:versionCode="1"
    android:versionName="1.0">
    <application android:icon="@drawable/icon" android:label="@string/app_name">
    <activity android:name=".ImplicitIntentsActivity"
    android:label="@string/app_name">
    <intent-filter>
    <action android:name="android.intent.action.MAIN" />
    <category android:name="android.intent.category.LAUNCHER" />
    </intent-filter>
    <intent-filter>
    <action android:name="android.intent.action.VIEW" />
    <category android:name="android.intent.category.DEFAULT" />
    </intent-filter>
    </activity>
    </application>
    <uses-sdk android:minSdkVersion="8" />
    <uses-permission android:name="android.permission.CALL_PHONE"/>
    </manifest>

    Android #6: Working with Android Intents - Part 1

    Android Intents are used for event notifications thus notifying applications about an event through passing messages between components/activities. In simple words, intents are messages that are passed between components. An Intent object holds the content of the message. For example, notifies when a SMS arrives, or SD card inserted into the device etc. Any component that wants to invoke another component has to express only through “intents” to perform a job.

    Intents are typically used to activate components such as activities, services, and broadcast receivers. That is for launching an activity, broadcast messages for broadcast receivers, start a service/bind a service to communicate with any background service. Intents typically needs the basic information’s such as action to be performed and data to operate on.

    1. For activating the activity component, intent object holding the message content is passed to startActivity or startActivityForResult operations
    2. For activating the service component, intent object holding the message content is passed to startService operation
    3. For initiating a broadcast, intent object holding the message content is passed to sendBroadcast, sendOrderedBroadcast, and sendStickyBroadcast operations

    Communication between components is achieved through intents. There are two primary form of intents namely

    1. Implicit Intents: Intents that do not name or specify a target component are termed as Implicit Intents. It is left to the platform to find an appropriate component to respond to the intent. Android platform resolves as to which component is most suitable to respond to such implicit intents using intent filters configured within Android Manifest file.
    2. Explicit Intents: Unlike Implicit Intents, you actually specify the target component that is required to respond to the intent.
    Typical Intents Usage:

    • Inter-Activity (Activity-to-Activity) Communication: Here we can use Intents to pass information between activities wherever we have a need for creating multiple activities, and there exists a need for communicating/passing information between them. The activities can be implicit or explicit activities
    • Activity-Service Communication: Here we can use Intents to make a service perform a information update in an activity.
    Examples:

    Thought would create three different examples to show on inter-activity (activity-to-activity) communication in separate posts.

    1. Implicit Intents example: This example demonstrates the inter-activity communication and will show on invoking some of the built-in Android activities from one activity (http://satworks.blogspot.com/2010/12/android-7-working-with-android-intents.html)
    2. Explicit Intents example: This example demonstrates the inter-activity communication and will show on invoking user defined custom activities from one activity (http://satworks.blogspot.com/2010/12/refer-previous-post-to-get-background.html)
    3. Explicit Intents with return example: This example demonstrates the inter-activity communication and will show on invoking user defined custom activities from one activity but instead of passing the control to the invoked activity, will stay on the current invoking activity with values updated from invoked activity (http://satworks.blogspot.com/2010/12/android-9-working-with-android-intents.html)

    Sunday, December 12, 2010

    Android #5: Working with Custom Fonts

    All Android devices comes with a standard collection of fonts namely Droid Sans, Droid Sans Mono, and Droid Serif as they are designed to be optimal for mobile displays. But there might be a need for using custom fonts for some special purposes say for example, Indic Tamil fonts which Android doesn’t support currently. So as a workaround in getting such fonts for a special need, we can go with using custom fonts features that Android supports.

    Following example illustrates on using custom fonts in Android application


    layout/main.xml:

    <?xml version="1.0" encoding="utf-8"?>
    <LinearLayout xmlns:android="http://schemas.android.com/apk/res/android"
    android:orientation="vertical" android:layout_width="fill_parent"
    android:layout_height="fill_parent">
    <TextView android:layout_width="fill_parent"
    android:layout_height="wrap_content" android:textSize="27px"
    android:text="@string/msg" />
    <!-- Line -->
    <View android:layout_width="fill_parent" android:layout_height="2dp"
    android:background="#99CCFF" />
    <TextView android:id="@+id/tamilTxtId" android:layout_width="fill_parent"
    android:layout_height="wrap_content" android:textSize="27px"
    android:textColor="#CDE472" />
    <TextView android:id="@+id/txtId" android:layout_width="fill_parent"
    android:layout_height="wrap_content" android:text="@string/engFont"
    android:textSize="27px" android:textColor="#CDE472" />
    </LinearLayout>

    CustomFontActivity.java:

    package in.satworks.android.samples.activity;import android.app.Activity;
    import android.graphics.Typeface;
    import android.os.Bundle;
    import android.widget.TextView;

    public class CustomFontActivity extends Activity {
    /** Called when the activity is first created. */
    @Override
    public void onCreate(Bundle savedInstanceState) {
    super.onCreate(savedInstanceState);
    setContentView(R.layout.main);
    // Use ENGLISH font
    Typeface face=Typeface.createFromAsset(getAssets(), "fonts/VLADIMIR.ttf">
    TextView txtView=(TextView)findViewById(R.id.txtId);
    txtView.setTypeface(face);
    // Use TAMIL font
    Typeface tamilFace=Typeface.createFromAsset(getAssets(), "fonts/Eltpan-n.ttf");
    TextView tamilTxtView=(TextView)findViewById(R.id.tamilTxtId);
    tamilTxtView.setText("1: \u0053\u00D6\u005D\u00EB \u0045\u005D\u00EB \u0053\u0081\u0054\u005D\u00EB");
    tamilTxtView.setTypeface(tamilFace);
    }
    }
    Custom Fonts:
    Custom font files need to be dropped under assets folder of your android project
    • assets/fonts/VLADIMIR.TTF
    • assets/fonts/Eltpan-n.ttf

    Tuesday, November 9, 2010

    Android #4: Working with Android Resources - String Resources

    Typically the res folder within any android project contains all external resources such as icons, images, layout, string etc under the respective sub-folders within. All resources are bound to the app in a way that we can change them without the need to recompile the app or change any app code. Unlike assets, android generates an ID in R.java file (auto-generated file) for each resource file using which they will be accessed within the code. Resources are very much useful when developing multi-lingual app supporting l10n and i18n.

    Types of resources:
    • Strings, colors, arrays, dimensions are defined in res/values/ directory. Typical usage would be in Localization and Internationalization
    • Images are defined in res/drawable directory. Typical usage would be to put all the images or icons that an application needs
    • XML’s are defined in res/xml/ directory for xml files. Typical usage would be to hold custom data that can be used in application
    • Layout resources are defined in res/layout/ for declaring the views. Typical usage would be to construct the user interface of the activities
    Following example illustrates accessing resources from res folder in a simple android project:


    Working with String resources:

    Android offers three types of string resources: Plain Strings, string formats and styled texts. Refer the following examples

    layout/main.xml:
    <?xml version="1.0" encoding="utf-8"?>
    <LinearLayout xmlns:android="http://schemas.android.com/apk/res/android"
    android:orientation="vertical" android:layout_width="fill_parent"
    android:layout_height="fill_parent">

    <!-- ResourceDemo -->
    <TextView android:layout_width="fill_parent"
    android:layout_height="wrap_content" android:text="@string/resPlainStrTxt"
    android:textColor="#CDE472" />

    <!-- Line -->
    <View android:layout_width="fill_parent" android:layout_height="2dp"
    android:background="#99CCFF" />

    <TextView android:layout_width="fill_parent"
    android:layout_height="wrap_content"
    android:text="Plain String Resources - This is referenced from res/layout/main.xml"
    android:textColor="#CDE472" />

    <!-- Line -->
    <View android:layout_width="fill_parent" android:layout_height="2dp"
    android:background="#99CCFF" />

    <TextView android:id="@+id/resPlainStrTxtId"
    android:layout_width="fill_parent" android:layout_height="wrap_content"
    android:textColor="#CDE472" />

    <!-- Line -->
    <View android:layout_width="fill_parent" android:layout_height="2dp"
    android:background="#99CCFF" />

    <TextView android:id="@+id/resFormattedStrTxtId"
    android:layout_width="fill_parent" android:layout_height="wrap_content"
    android:text="@string/resFormattedStrTxt" android:textColor="#CDE472" />

    <!-- Line -->
    <View android:layout_width="fill_parent" android:layout_height="2dp"
    android:background="#99CCFF" />

    <TextView android:id="@+id/resStyledStrTxtId" android:layout_width="fill_parent"
    android:layout_height="wrap_content" android:textColor="#CDE472" android:text="@string/resStyledStrTxt"/>

    <!-- Line -->
    <View android:layout_width="fill_parent" android:layout_height="2dp"
    android:background="#99CCFF" />

    </LinearLayout>
    ResourceDemoActivity.java
    package in.satworks.android.samples.activity;

    import android.app.Activity;
    import android.os.Bundle;
    import android.widget.TextView;

    public class ResourceDemoActivity extends Activity {
    private TextView resPlainStrTxtView=null;
    private TextView resFormattedStrTxtView=null;
    private TextView resStyledStrTxtView=null;
    /** Called when the activity is first created. */
    @Override
    public void onCreate(Bundle savedInstanceState) {
    super.onCreate(savedInstanceState);
    setContentView(R.layout.main);

    // Working with resources - Start
    // Accessing Resources for Plain String contents from the resources folder - start
    resPlainStrTxtView=(TextView)findViewById(R.id.resPlainStrTxtId);
    resPlainStrTxtView.setText("Plain String Resources - This is referenced from code");
    // Accessing Resources for Plain String contents from the resources folder - end

    // Accessing Resources for Formatted String contents from the resources folder - start
    resFormattedStrTxtView=(TextView)findViewById(R.id.resFormattedStrTxtId);
    String formatStr=getString(R.string.resFormattedStrTxt);
    String formattedStr=String.format(formatStr, "- \"This New Formatted Text\"");
    resFormattedStrTxtView.setText(formattedStr);
    // Accessing Resources for Formatted String contents from the resources folder - end

    // Accessing Resources for Formatted String contents from the resources folder - start
    resStyledStrTxtView=(TextView)findViewById(R.id.resStyledStrTxtId);
    /* without styling
    String styleStr=getString(R.string.resStyledStrTxt);
    resStyledStrTxtView.setText(styleStr);
    */
    // with styling
    resStyledStrTxtView.setText(R.string.resStyledStrTxt);
    // Accessing Resources for Formatted String contents from the resources folder - end
    // Working with resources - End
    }
    }
    values/strings.xml:
    <?xml version="1.0" encoding="utf-8"?>
    <resources>
    <string name="app_name">ResourceDemo</string>
    <string name="resPlainStrTxt">Plain String Resources - This is referenced from res/values/string.xml</string>
    <string name="resFormattedStrTxt">Formatted String Resources - This is referenced from res/values/string.xml and is formatted with %1$s</string>
    <string name="resStyledStrTxt">Styled String Resources - This is referenced from res/values/string.xml and is styled with \n<b>bold</b>, \n<u>underline</u> and \n<i>italics</i></string>
    </resources>

    Monday, November 8, 2010

    Android #3: Working with Android Assets

    Assuming that the user knows to create a HelloWorld kinda simple android app, we will look into understanding assets and means to access them within the android app.

    Working with Assets:

    Typically the asset folder within any android project that contains static files that one wishes to package within the application for deployment onto the device, read as a stream of bytes and accessed as just like the way we access the file system in java programming language. All files within this folder doesn’t generate an ID in R.java file (auto-generated file).

    Following example illustrates accessing contents of a static file from the assets folder in a simple android project:


    main.xml:

    <?xml version="1.0" encoding="utf-8"?>
    <LinearLayout xmlns:android="http://schemas.android.com/apk/res/android"
    android:orientation="vertical" android:layout_width="fill_parent"
    android:layout_height="fill_parent">

    <!-- AssetDemo -->
    <TextView android:id="@+id/assetTxtId" android:layout_width="fill_parent"
    android:layout_height="wrap_content" android:textColor="#FFCC33" />

    </LinearLayout>
    AssetDemoActivity.java:

    package in.satworks.android.samples.activity;

    import java.io.BufferedReader;
    import java.io.IOException;
    import java.io.InputStream;
    import java.io.InputStreamReader;

    import android.app.Activity;
    import android.content.res.AssetManager;
    import android.os.Bundle;
    import android.widget.TextView;

    public class AssetDemoActivity extends Activity {
    private TextView assetTxtView=null;
    /** Called when the activity is first created. */
    @Override
    public void onCreate(Bundle savedInstanceState) {
    super.onCreate(savedInstanceState);
    setContentView(R.layout.main);

    // Retrieving contents of a static file from the assets folder - start
    assetTxtView=(TextView)findViewById(R.id.assetTxtId);
    readAsset();
    // Retrieving contents of a static file from the assets folder - end
    }

    private void readAsset()
    {
    //Get asset manager instance
    AssetManager assetMngr=getAssets();
    //Read contents from file under assets
    try {
    InputStream inStream=assetMngr.open("HelloAsset.txt");
    BufferedReader bReader=new BufferedReader(new InputStreamReader(inStream));
    String assetText="";
    String asText="";
    while((asText=bReader.readLine())!=null)
    {
    System.out.println("[AssetDemoActivity] [assetText] ***** "+assetText);
    assetText=assetText+asText+"\n";
    }
    assetTxtView.setText(assetText);
    bReader.close();
    inStream.close();
    } catch (IOException e) {
    e.printStackTrace();
    }
    }
    }

    assets/HelloAsset.txt:
    AssetDemo: This is referenced from assets/HelloAsset.txt

    Tuesday, October 5, 2010

    Trends: Smarter Internet TV

    Just like smart phones, Google has come-up with the concept of smart TV where just like the platform such as Android, it will have an open software platform probably a mix of Android and Chrome enabling any developer to develop applications for it. Google is yet to release the Google SDK and web APIs for TV using which developers can build richer applications and then distribute them through Android Market

    Screen shot:


    Key features:
    1. Search within TV to fetch all related content across every channel, app and web simultaneously. Search & record features for DTH subscribers
    2. Browse the web with support for even watching web and TV at the same time.
    3. Use apps similar to smart phone apps with support for existing Android Market apps that will be soon supported within Google TV
    4. Use smart phones like Android Phones or iPhone as TV remote control with multiple phones support to control the same TV
    5. Personalize within what one watches within the TV
    6. Easy set-up with seamless integration with existing TV and internet
    Google-vantages:

    • Placing geo-target advertisements wherein helping the local businesses and targeting more users and all couch potatoes :)
    • People watching Google TV can place orders or search for more info on the advertised products based on the commercial
    • Companies providing video-on-demand services like NetFlix, Amazon Video-on-Demand can improvise their business by targeting their services on multi-platforms
    • Users using Android Phones will benefit in accessing apps on both smart phones and as well their TV. In addition, ease for Android developers to develop apps
    • Enables the social media users to stay connected with their friends even while watching TV

    Google might use this platform for enabling or benefiting the different segmentized users by
    So what one needs to get Google TV ?

    • Standalone smart TV like the one introduced recently by Sony named Sony Internet TV - a HDTV incorporating the Google TV platform, or
    • Separate set-up box kinda to use with your current TV like the one introduced by Logitech named Logitech Revue Google TV companion box that connects to your TV with an HDMI port

    As these products are just introduced, we will have to wait for them to be available in retail soon may be in the year 2011. As a fact of trend that most world's favorite websites are being tweaked and perfected for TV nowadays, it will pick-up in those lines of business or similar kinda business bringing more and more such products into the market enriching user experience

    So guyz get ready for developing apps for the TV now!!

    Reference Links:

    Tuesday, August 17, 2010

    Trends: Wireless Electricity..the invisible power

    As I could remember, it all started with radio transmitters, television remote control, cellphones and then the Wi-Fi routers for wireless network/internet, wireless gaming controllers, Global Positioning Systems (GPS). These systems uses some form of energy like radio frequency, infrared light, acoustic energy etc to transfer data without wires. But now the trend seems to move towards wireless chargers for these and/or most other devices. So how did this begin for the guy who found this?

    Marin Soljacic, Assistant Professor of Physics at Massachusetts Institute of Technology (MIT) came to invent this idea when he noticed a mobile phone beeped starving to get charged which made him to think on why the phone is not capable of self charging when all the needed electrical source is near-by. So to make this possible, one has to find a way to transfer power from existing wired source to cell phone - without wires without much affect to things around it. So he started thinking on this phenomenon that could make this dream a reality. He dug into the problem and learned that if you could get two magnetic fields to resonate with the same note, they could transfer an electric current

    MIT, his employer, quickly patented the technology and encouraged Soljacic to start a company. That's how WiTricity started with 15 employees to take forward this idea. To answer the safety concerns, he explained that in fact, the coils turn electricity into magnetic fields, then back into electricity. Magnetic fields interact weakly with humans; as far as the fields are concerned, we are no different from air.

    Technology:

    From their technology notes, When two objects have the same resonant frequency, they exchange energy strongly without having an effect on other, surrounding objects. For example, it is resonance that can cause a wine glass to explode when a singer hits exactly the right tone. But instead of using acoustic resonance, Witricity's approach exploits the resonance of low frequency electromagnetic waves.


    How Wireless Power works


    1. Magnetic coil (Antenna A) is housed in a box and can be set in wall or ceiling.
    2. Antenna A, powered by mains, resonates at a specific frequency.
    3. Electromagnetic waves transmitted through the air.
    4. Second magnetic coil (Antenna B) fitted in laptop/TV etc resonates at same frequency as first coil and absorbs energy.
    5. Energy charges the device.

    The system uses two coils - one plugged into the mains and the other embedded or attached to the gadget. Each coil is carefully engineered with the same resonant frequency. When the main coil is connected to an electricity supply, the magnetic field it produces is resonant with that of with the second coil, allowing "tails" of energy to flow between them.

    As each "cycle" of energy arrives at the second coil, a voltage begins to build up that can be used to charge the gadget.

    Devices using the system would automatically begin to charge as soon as they were within range, he said.

    Applications:

    WiTricity’s wireless power transfer technology can be applied in a wide variety of applications and environments. WiTricity technology can be used to provide:
    • Wireless Power—when all the power a device needs is provided wirelessly, and no batteries are required. This mode is for a device that is always used within range of its WiTricity power source.
    • Automatic Wireless Charging—when a device with rechargeable batteries charges itself while still in use or at rest, without requiring a power cord or battery replacement. This mode is for a mobile device that may be used both in and out of range of its WiTricity power source.

    Detailed List of applications that can use this technology:
    Reference Links: